Introduction
This post is going to be a composition of the practical parts of two posts, one written late last year and the other a couple of months ago respectively. The posts being Apache Zeppelin: stairway to notes* haven! (late Dec 2018) and Running your JuPyTer notebooks on Oracle Cloud Infrastructure (early September 2019). Although this time we are going to make Apache Zeppelin run on the Oracle Cloud Infrastructure….
Tag Archives: Adopt OpenJDK
Running your JuPyTeR notebooks on the cloud

Introduction
On the back of my previous share on how to build and run a docker container with Jupyter, I’ll be taking this further on how we can make this run on a cloud platform.
We’ll try to do this on Oracle Cloud Infrastructure (OCI). In theory, we should be able to do everything in the blog on any VM or Baremetal instance. If you are new to Oracle Cloud, I would suggest getting familiar with the docs and Getting Started sections of the docs. You will also find several informative links at the bottom of this post, in the Resources section…
Originally published on Medium.com: Running your JuPyTeR notebooks on the cloud
My first couple of months at Codurance
Some background
 Some of you may know me from the various meetups in the city, especially my attendance at a number of LJC and LSCC meetup events. Attending these events I learnt about various conferences like Devoxx, SoCraTes, JAX London, Java2Days, OpenFest, and I ended up attending and later presenting on various topic including Adopt OpenJDK.
During this time I met a lot of people with various levels of experience and my interest and urge to learn more about the Java/JVM platform, Code Quality, Software Design, XP Practices, Software Craftsmanship, etc…, were on the rise and saw no end. And whilst attending these events I came across Sandro and Mash, who were in those days hosting LSCC events. I went to many of LSCC events, especially liked the hands-on sessions (which are still my favourite).
I also noticed that many things I learnt at such events and conferences wouldn’t always be immediately recognised or accepted at the workplace. And moving to another work environment didn’t always solve this problem fully. I found that I wasn’t learning what I wanted from my peers and the things I learnt from the community I couldn’t apply at work. Besides very few were really in tuned with what the community was about. So one fine day I decided to take charge of my career and make a serious decision and take up the Apprenticeship program offered by Codurance and go through the process.
I was urged to go this way after being inspired by Sandro’s book: The Software Craftsman, attending all the SoCraTes UK conferences, and meeting with developers who valued and took pride of their work namely their craft.
I was urged to go this way after being inspired by Sandro’s book: The Software Craftsman, attending all the SoCraTes UK conferences, and meeting with developers who valued and took pride of their work namely their craft.
Where we are just now
It’s now been nearly two months since I have been working for Codurance, a formidable force. And so it’s also about time that I share my experiences with my fellow mates and the community around me.
During my first few weeks at Codurance, I have been busy learning various things that have been chalked out for becoming a craftsman.
When working on a kata or learning a concept, we paired or did what is known as ‘mob programming’ along with other apprentices and craftsmen. And most of the time used the pomodoro technique. Time boxing our work in intervals is something done both in groups and working individually. We would have a lot of discussions and retrospectives after working on a problem or writing some code from scratch.
Structure of my program
We used an internal tool based on the concept of Impact Mapping. I soon got interested in it when I saw my colleague Franzi (who is now a craftswoman) had used it to plan out her Apprenticeship route. Such a tool helps map out our goals and the tasks we need to perform to achieve it. And this can differ from person-to-person, depending on what they want to work on (driven by the Apprentice).
My mentor and other craftsmen reviewed them to get an idea of what I wanted to achieve for myself. And then its up to me to apply my own drive and perseverance to achieve the individual stories. My mentor and I meet and talk informally on a regular basis, many times pairing on a kata or a project or on the white board trying to get my head around a concept.
Days in the life of an Apprentice
I found the working hours quite flexible, remote working is also an option (when you are on the bench or if the client allows, if you are in a project). Our co-founders are understanding and compassionate about our individual situations.
Meetings are at their minimum, except for a weekly Apprentices meeting (run by an Apprentice and guided by at least one Craftsperson) and a bi-monthly company-wide catchup.
The Apprentices meetings are full of fun — we are accompanied by at least one Craftsperson, who disperses their knowledge and experience from a wide variety of topics designed to help us in the journey and fill the gaps in our knowledge and experience.
A bi-monthly catchup involves sharing of knowledge via lightning talks, discussions and pairing sessions on pet projects over pizzas and beer (and of course veggies and non-alcoholic beverages for the teetotalers).
Katas, code reviews, mob programming and projects make up a learning week – all of these done individually or when pairing with another.
Katas
On a daily basis I have worked on different katas or try to solve the same kata in various different ways (using different testing and refactoring approaches). This in turn gave me better insights into designing and refactoring techniques. Trying to solve the same problem in different ways has a positive impact on our problem solving skills especially when writing code. In my case I also learnt how to use the different libraries and methods to write tests. I would like to cite Samir, thanks to you, for the suggesting this approach during the first week of my Apprenticeship.
Code reviews
Just last week we did a group code review and time-boxed ourselves, performed a retrospective at the end of each interval and ensured we delivered a good chunk of the feedback before close of play. Such regular code review exercises are helping all of us learn about how to code better as we are not only learning from feedback from the tools we used, but also through exchange of feedback from our peers who were involved in the group code review session.
Software Design, Specification Gathering & Communication
Recently we had an interesting mob-programming session where we were trying to model and write a game. At the end of the session, we had a retrospective, discussing the things we did well and didn’t do well. Each of the apprentices and craftsmen were performing a specific role i.e. Developer, Domain Expert, etc… We learnt in retrospective, about areas where we could have done better and should focus on. That any test written gives immediate feedback about how well we have understood the domain and if we were taking the right approach. Why a certain approach when starting a project is more advantageous than another approach. What questions to ask and why it is important to ask the right questions to the domain expert or to give the right level of information to another developer and vice-versa. Sandro has described this process in detail in his blog post recently.
Fun, socialising and sharing
I found our office environment to be conducive to learning, sharing and collaboration. We even have a pairing rota that we use from time-to-time to record or suggest pairing sessions during the week.
We share links to events, conferences, tweets, interesting articles, videos, blog posts, etc… via slack, document discussions and brain dumps via Google doc, huddles during lunch- and tea- breaks to talk about anything we are working on. Thanks to the library of printed and digital books to our disposal, the huge collection of blog posts and videos on our site.
The apprentices and some craftsmen have collectively started a social event which of course happens every Friday, sometimes it’s dinner at a nearby restaurant, while at other times an indoor movie over snacks and drinks at our office premises.
It is worthwhile and that’s why we are here
It is a privilege to be able to work alongside very experienced craftsmen from our industry. We are very lucky and thankful to have the opportunity to be guided and mentored by talented and like minded developers.
This is my first job where the company has a completely flat hierarchy and where we share similar values.

Closing note
Work is fun and learning is enjoyable when we love what we do and are amongst friends with similar goals and aspirations.
Thank you for taking the time to read this post and I hope it was interesting. Looking forward to write more and share such experiences in future posts.
Many thanks to Sandro, Tomaz, Alex, Franzi and David for all the feedback provided for this blog post.
Why not build #OpenJDK 9 using #Docker ? – Part 2 of 2
…continuing from Why not build #OpenJDK 9 using #Docker ? – Part 1 of 2.
I ran into a number of issues and you can see from my commits, I pulled myself out of it, but to run this Dockerfile from the command-line I used this instruction:
$ docker build -t neomatrix369/openjdk9 .
you can also do it using the below if you have not set your permissions:
$ sudo docker build -t neomatrix369/openjdk9 .
and get the below (summarised) output:
Sending build context to Docker daemon 3.072 kB
Sending build context to Docker daemon
Step 0 : FROM phusion/baseimage:latest
 ---> 5a14c1498ff4
Step 1 : MAINTAINER Mani Sarkar (from @adoptopenjdk)
 ---> Using cache
 ---> 95e30b7f52b9
Step 2 : RUN apt-get update &&   apt-get install -y     libxt-dev zip pkg-config libX11-dev libxext-dev     libxrender-dev libxtst-dev libasound2-dev libcups2-dev libfreetype6-dev &&   rm -rf /var/lib/apt/lists/*
 ---> Using cache
 ---> 1ea3bbb15c2d
Step 3 : RUN apt-get update
 ---> Using cache
 ---> 6c3938f4d23d
Step 4 : RUN apt-get install -y mercurial ca-certificates-java build-essential
 ---> Using cache
 ---> e3f99b5a3bd3
Step 5 : RUN cd /tmp &&   hg clone http://hg.openjdk.java.net/jdk9/jdk9 openjdk9 &&   cd openjdk9 &&   sh ./get_source.sh
 ---> Using cache
 ---> 26cfaf16b9fa
Step 6 : RUN apt-get install -y wget &&   wget --no-check-certificate --header "Cookie: oraclelicense=accept-securebackup-cookie" http://download.oracle.com/otn-pub/java/jdk/8u45-b14/jdk-8u45-linux-x64.tar.gz
 ---> Using cache
 ---> 696889250fed
Step 7 : RUN tar zxvf jdk-8u45-linux-x64.tar.gz -C /opt
 ---> Using cache
 ---> c25cc9201c1b
Step 8 : RUN cd /tmp/openjdk9 &&   bash ./configure --with-cacerts-file=/etc/ssl/certs/java/cacerts --with-boot-jdk=/opt/jdk1.8.0_45
 ---> Using cache
 ---> 4e425de379e6
Step 9 : RUN cd /tmp/openjdk9 &&   make clean images
 ---> Using cache
 ---> 2d9e17c870be
Step 10 : RUN cd /tmp/openjdk9 &&   cp -a build/linux-x86_64-normal-server-release/images/jdk     /opt/openjdk9
 ---> Using cache
 ---> 9250fac9b500
Step 11 : RUN cd /tmp/openjdk9 &&   find /opt/openjdk9 -type f -exec chmod a+r {} + &&   find /opt/openjdk9 -type d -exec chmod a+rx {} +
 ---> Using cache
 ---> d0c597d045d4
Step 12 : ENV PATH /opt/openjdk9/bin:$PATH
 ---> Using cache
 ---> 3965c3e47855
Step 13 : ENV JAVA_HOME /opt/openjdk9
 ---> Using cache
 ---> 5877e8efd939
Successfully built 5877e8efd939
The above action creates an image which is stored in your local repository (use docker images to enlist the images in the repo). If you want to load the image into a container, and access the files it has built or see anything else, do the below:
$ sudo docker run -it --name openjdk9 neomatrix369/openjdk9 /bin/bash
this will take you to a bash prompt into the container and you can run any of your linux commands and access the file system.
Explaining docker run
$ sudo docker run -it --name openjdk9 neomatrix369/openjdk9 java -version
will show you this
openjdk version "1.9.0-internal"
OpenJDK Runtime Environment (build 1.9.0-internal-_2015_06_04_06_46-b00)
OpenJDK 64-Bit Server VM (build 1.9.0-internal-_2015_06_04_06_46-b00, mixed mode)
Here’s a breakdown of the docker run command:
docker run |
The command to create and start a new Docker container. |
-it |
To run in interactive mode, so you can see the after running the container. |
neomatrix369/openjdk9 |
This is a reference to the image tag by name (which we created above). |
java -version |
Runs the java command asking its version, inside the containing, which is assisted by the two environment variables PATH and JAVA_HOME which was set in the Dockerfile above. |
Footnotes
You might have noticed I grouped very specific instructions with each step, especially the RUN commands, its because, each time I got one of these wrong, it would re-execute the step again, including the steps that ran fine and didn’t need re-executing. Not only is this unnecessary its not using our resources efficiently which is what Docker brings us. So any addition, edition or deletion to any step will only result in that step being executed, and not the other steps that are fine.
So one of the best practises is to keep the steps granular enough and pre-load files and data beforehand and give it to docker. It has amazing caching and archiving mechanisms built in.
Save our work
As we know if we do not save the container into the image, our changes are lost.
If I didn’t use the docker build command I used earlier I could have, after the build process was completed and image created, used the below command:
$ sudo docker commit [sha of the image] neomatrix369/openjdk9
Sharing your docker image on Docker hub
Once you are happy with your changes, and want to share it with community at large, do the below:
$ sudo docker push neomatrix369/openjdk9
and you will see these depending on which of your layers have been found in the repo and which ones are new (this one is an example snapshot of the process):
The push refers to a repository [neomatrix369/openjdk9] (len: 1)
5877e8efd939: Image already exists
3965c3e47855: Image already exists
d0c597d045d4: Image already exists
9250fac9b500: Image already exists
2d9e17c870be: Buffering to Disk
.
.
.
There is plenty of room for development and improvement of this Docker script. So happy hacking and would love to hear your feedback or contributions from you.
BIG Thanks
Big thanks to the below two who proof-read my post and added value to it, whilst enjoying the #Software #Craftsmanship developer community (organised and supported by @LSCC):
Oliver Nautsch – @ollispieps (JUG Switzerland)
Amir Bazazi (@Codurance) – @amirbazazi
Special thanks to Roberto Cortez (@radcortez) for your Docker posts, these inspired and helped me write my first Docker post.
Resources
[1] Docker
[2] Get into Docker – A Guide for Total Newbies
[3] Docker for Total Newbies Part 2: Distribute Your Applications with Docker Images
[4] Docker posts on Voxxed
[5] OpenJDK
[6] Building OpenJDK
[7] Building OpenJDK on Linux, MacOs and Windows
[8] Virtual Machines (OpenJDK)
[9] Build your own OpenJDK
[10] Vagrant script (OpenJDK)
[11] YOUR DOCKER IMAGE MIGHT BE BROKEN without you knowing it
[12] Dockerfile on github
[13] Adopt OpenJDK: Getting Started Kit
[14] London Java Community
Why not build #OpenJDK 9 using #Docker ? – Part 1 of 2
Introduction
I think I have joined the Docker [1] party a bit late but that means by now everyone knows what Docker is and all the other basic fundamentals which I can very well skip, but if you are still interested, please check these posts Get into Docker – A Guide for Total Newbies [2] and Docker for Total Newbies Part 2: Distribute Your Applications with Docker Images [3]. And if you still want to know more about this widely spoken topic, check out these Docker posts on Voxxed [4].
Why ?
Since everyone has been doing some sort of provisioning or spinning up of dev or pre-prod or test environments using Docker [1] I decided to do the same but with my favourite project i.e. OpenJDK [5].
So far you can natively build OpenJDK [6] across Linux, MacOs and Windows [7], or do the same things via virtual machines or vagrant instances, see more on then via these resources Virtual Machines, [8] Build your own OpenJDK [9] and this vagrant script [10]. All part of the Adopt OpenJDK initiative lead by London Java Community [14] and supported by JUGs all over the world.
Requirements
Most parts of post is for those using Linux distributions (this one was created on Ubuntu 14.04). Linux, MacOS and Windows users please refer to Docker‘s Linux, MacOS and Windows instructions respectively.
Hints: MacOS and Windows users will need to install Boot2Docker and remember to run the below two commands (and check your Docker host environment variables):
$ boot2docker init
$ boot2docker up
$ boot2docker shellinit
For the MacOS, if the above throw FATA[…] error messages, please try the below:
$ sudo boot2docker init
$ sudo boot2docker up
$ sudo boot2docker shellinit
For rest of the details please refer to the links provided above. Once you have the above in place for the Windows or MacOS platform, by merely executing the Dockerfile using the docker build and docker run commands you can create / update a container and run it respectively.
*** Please refer to the above links and ensure Docker works for you for the above platforms – try out tutorials or steps proving that Docker run as expected before proceeding further. ***
Building OpenJDK 9 using Docker
Now I will show you how to do the same things as mentioned above using Docker.
So I read the first two resource I shared so far (and wrote the last ones). So lets get started, and I’m going to walk you through what the Dockerfile looks like, as I take you through each section of the Dockerfile code.
*** Please note the steps below are not meant to be executed on your command prompty, they form an integral part of the Dockerfile which you can download from here at the end of this post. ***
You have noticed unlike everyone else I have chosen a different OS image i.e. phusion/baseimage, why? Read YOUR DOCKER IMAGE MIGHT BE BROKEN without you knowing it [11], to learn more about it.
FROM phusion/baseimage:latest
Each of the RUN steps below when executed becomes a Docker layer in isolation and gets assigned a SHA like this i.e. 95e30b7f52b9.
RUN \
  apt-get update && \
  apt-get install -y \
    libxt-dev zip pkg-config libX11-dev libxext-dev \
    libxrender-dev libxtst-dev libasound2-dev libcups2-dev libfreetype6-dev && \
  rm -rf /var/lib/apt/lists/*
The base image is updated and a number of dependencies are installed i.e. Mercurial (hg) and build-essential.
RUN \
  apt-get update && \
  apt-get install -y mercurial ca-certificates-java build-essential
Clone the OpenJDK 9 sources and download the latest sources from mercurial. You will notice that each of these steps are prefixed by this line cd /tmp &&, this is because each instruction is run in its own layer, as if it does not remember where it was when the previous instruction was run. Nothing to worry about, all your changes are still intact in the container.
RUN \
  cd /tmp && \
  hg clone http://hg.openjdk.java.net/jdk9/jdk9 openjdk9 && \
  cd openjdk9 && \
  sh ./get_source.sh
Install only what you need when you need them, see below I downloaded wget and then the jdk binary. I also learnt how to use wget by passing the necessary params and headers to make the server give us the binary we request. Finally un-tar the file using the famous tar command.
RUN \
  apt-get install -y wget && \
  wget --no-check-certificate --header "Cookie: oraclelicense=accept-securebackup-cookie" \
http://download.oracle.com/otn-pub/java/jdk/8u45-b14/jdk-8u45-linux-x64.tar.gz

RUN \
  tar zxvf jdk-8u45-linux-x64.tar.gz -C /opt
Run configure with the famous –with-boot-jdk=/opt/jdk1.8.0_45 to set the bootstrap jdk to point to jdk1.8.0_45.
RUN \
  cd /tmp/openjdk9 && \
  bash ./configure --with-cacerts-file=/etc/ssl/certs/java/cacerts --with-boot-jdk=/opt/jdk1.8.0_45
Now run the most important command:
RUN \
  cd /tmp/openjdk9 && \
  make clean images
Once the build is successful, the artefacts i.e. jdk and jre images are created in the build folder.
RUN \
  cd /tmp/openjdk9 && \
  cp -a build/linux-x86_64-normal-server-release/images/jdk \
    /opt/openjdk9
Below are some chmod ceremonies across the files and directories in the openjdk9 folder.
RUN \
  cd /tmp/openjdk9 && \
  find /opt/openjdk9 -type f -exec chmod a+r {} + && \
  find /opt/openjdk9 -type d -exec chmod a+rx {} +
Two environment variable i.e. PATH and JAVA_HOME are created with the respective values assigned to them.
ENV PATH /opt/openjdk9/bin:$PATH
ENV JAVA_HOME /opt/openjdk9
You can find the entire source for the entire Dockerfile on github [12].
…more of this in the next post, Why not build #OpenJDK 9 using #Docker ? – Part 2 of 2, we will use the docker build, docker run commands and some more docker stuff.
What is being a good developer? How can we work to become better?
TL;DR
- future of the Java ecosystem
- JavaSE, Java EE workshops at Devoxx UK 2015
- OpenJDK and JSRs
- extraordinary developers
- hands-on sessions, hackdays and panel
- learn, collaborate and share
- developer communities, JUG leaders, and corporate participations
- thought leaders and tomorrow’s leaders of Java related topics
- agenda, costs, tickets and discount codes
The Adopt team are running workshops at Devoxx UK next month that will help to answer the questions posed above. Why should you get along to a workshop? Well, here’s an imagined conversation between you and the Adopt team to explain. The Adopt Team are an ever growing community from various parts of the developer community, mainly the JUGs worldwide, members of the JCP, developers, evangelists and technical representatives of various companies supporting and extending the Java ecosystem via the JCP, Adopt-a-JSR and Adopt OpenJDK programs.
You: I hear that there are a number of workshops going to be held during the first day of Devoxx UK 2015. What are these?
Adopt team: Yes, you heard right, we have a whole day (Wednesday) dedicated to it. In brief, the adopt team at Devoxx UK this year is comprised of experienced developers and leaders of various Java SE and Java EE topics i.e. OpenJDK, and a number of JSRs. These include members of the JCP as well. The topics range from learning how to build OpenJDK, working with devops tools, quality analysis tools, contributing and working with JSRs (guided by spec leads of the respective JSRs). Learning how to run a hackday if you want to start your own community where you are. And towards the end of the session you can get answers to the questions you have been pondering upon before or at the conference.
Have a look at the agenda to find out more.
You: Apart from OpenJDK, can you name some JSRs we will be involved with?
Adopt team: Good questions. We will have amongst us spec leads from the various JSRs:
- JSR 363, Units of Measurement API – Leonardo Lima
- JSR JSR 365, CDI 2.0 – Antoine Sabot-Durand
- Java EE 8, and some of the proposed component JSRs, including JSR 371 MVC, the Security JSR, and JMS – David Delabassee
You: I’m a busy person, and there’s lots on at Devoxx. Why would I spend time at these workshops rather than doing something else? What do I gain from it?
Adopt team: Depending the workshop you attend you attend and participate in, the benefits can be any or all of these:
- a great opportunity to feedback on tomorrow’s technology
- learn and contribute to these technologies even before they are released
- contributing to the future of the Java / Java platform
- learn how to build your own Java / JVM platform
- learn new technologies and improve your confidence,; including automation, code-coverage, testing technologies etc.
- be able to make contact with and talk to the developers who are leading one or more of the technologies
- be able to share with your own local user group / community the things you learn in the workshop
- become a part of the adopt community and keep in touch about current and future developments, hackdays and other workshops
Contributions can be in any form, from as simple as speaking about it to another colleague, writing a post about it, or even mentioning it on a relevant mailing list.
You: So who is this aimed at? Who is your target audience?
Adopt team: Our primary goal is to propagate the know-how and experience various Java User Group leaders all across the globe, but we see everyone else benefiting from it as well: students, professionals, tech leads, devops, trainers, experts, etc…
You: What if my company wishes to be involved? Can you give me examples of companies who are already involved in this program?
Adopt team: Yes, companies, user groups, dev communities are all welcome. A number of companies are involved with the adoption program including: Oracle, IBM, RedHat, SAP, Google, Twitter, Goldman Sachs, Credit Suisse, among many others.
You: Can I or my company make contributions to any of the projects?
Adopt team: Yes, of course, that’s the whole point. One of the reasons is not just spread awareness and know-how of the upcoming technologies in the Java/JVM world but also to show how you can do it yourself. The topics and subtopics are numerous and this is an opportunity to pick one and lead it. You can drive these technologies with the help other community members, helping move your vision forward. Come along to a workshop to find out more!
You: So how much more does it cost me or my company if I have to attend these workshops?
Adopt team: Have a look at the ticket prices for the university days and the combi-tickets. You can also take advantage of special discount codes from us to get further discounts on the final ticket prices (ranging from 10 to 20%).
You: What do we take along with us to be able to participate in the workshops ?
Adopt team: Bring along a laptop and a fresh mind to absorb all the knowledge and experience we have to share.
You: I hear this theme ‘The Extraordinary…. what is it about, tell me more” Why is this post so titled?
Adopt team: Another good question: to know more about the theme have a look at this http://www.devoxx.co.uk/2015/03/whats-theme/.
Good developers do what every developer does and more. They come to conferences like Devoxx, attend local dev events and talks, participate in workshops similar to the ones this post speaks about and then go out and share many of those things with other fellow developers in the form of blog posts, code snippets or even local community presentations.
You: What about those who can’t get to the workshop. How can they find out more and get involved?
Adopt team: These three websites are a great starting point to get to know more about the adopt programs: http://www.jcp.org, http://adoptopenjdk.java.net and http://adoptajsr.java.net/, but if you are based in London, the LJC organises a hackday every month, see http://www.meetup.com/Londonjavacommunity/events/222368734/, in the past developers from outside London and even outside the UK have visited the day-long hackdays.
You: So tell me how did this come about? Who do you credit the initiative to?
Adopt team: Nice question: credit must go to where it is due. Thanks to the support from the JCP organisation i.e. Heather VanCura and Mark Hazell for making it happen at Devoxx UK this year. Not forgetting that any event like this one isn’t possible without the help of local and worldwide developer communities, with the likes of London Java Community (@LJCJug), continuously supporting good developer endeavours.
You: How to get the code?
Adopt team: That’s an important question, get in touch with Heather VanCura (heather@jcp.org) or Mark Hazell (mark.hazell@devoxx.co.uk) and they should help you sort out a discount code for you, but hurry are they will get exhausted soon.
How is Java / JVM built ? Adopt OpenJDK is your answer!
Introduction & history
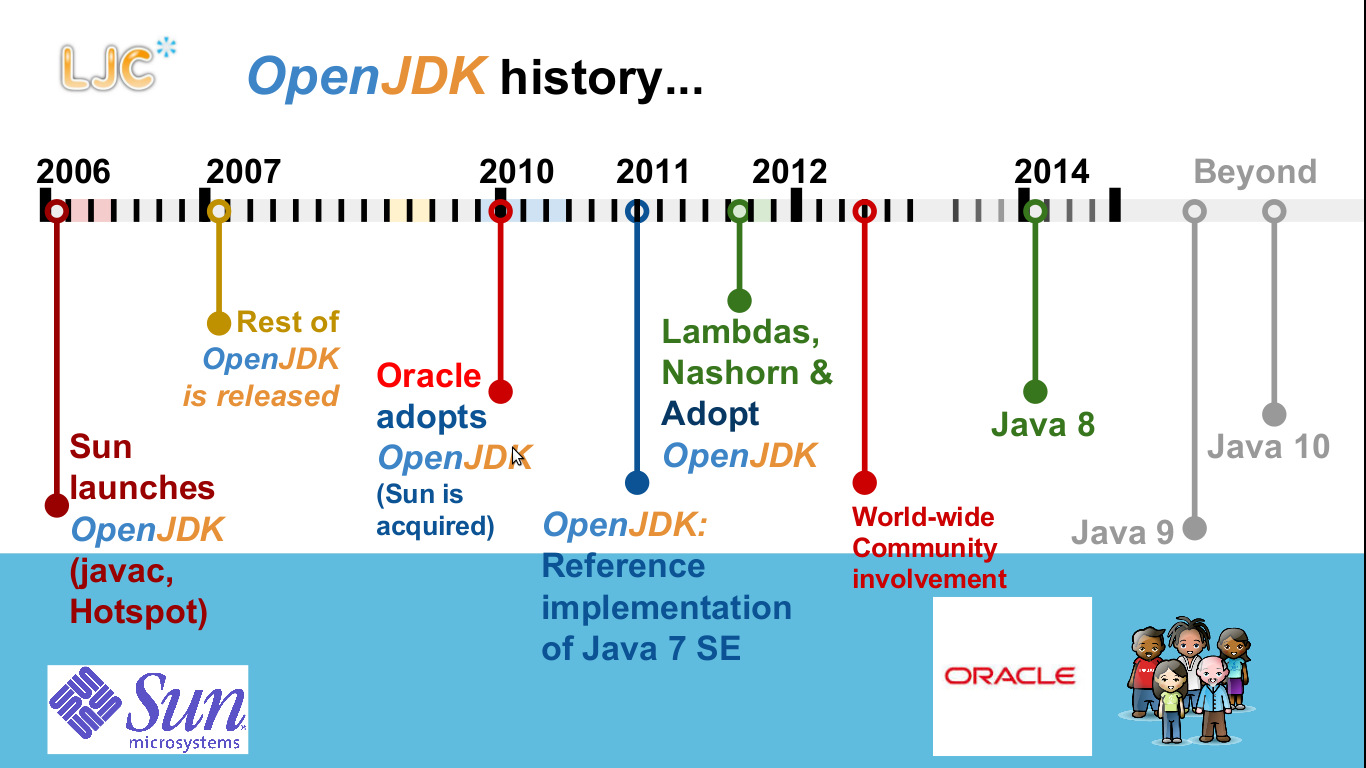
As some of you may already know, starting with Java 7, OpenJDK is the Reference Implementation (RI) to Java. The below time line gives you an idea about the history of OpenJDK:
 |
|
OpenJDK history (2006 till date)
|
If you have wondered about the JDK or JRE binaries that you download from vendors like Oracle, Red Hat, etcetera, then the clue is that these all stem from OpenJDK. Each vendor then adds some extra artefacts that are not open source yet due to security, proprietary or other reasons.
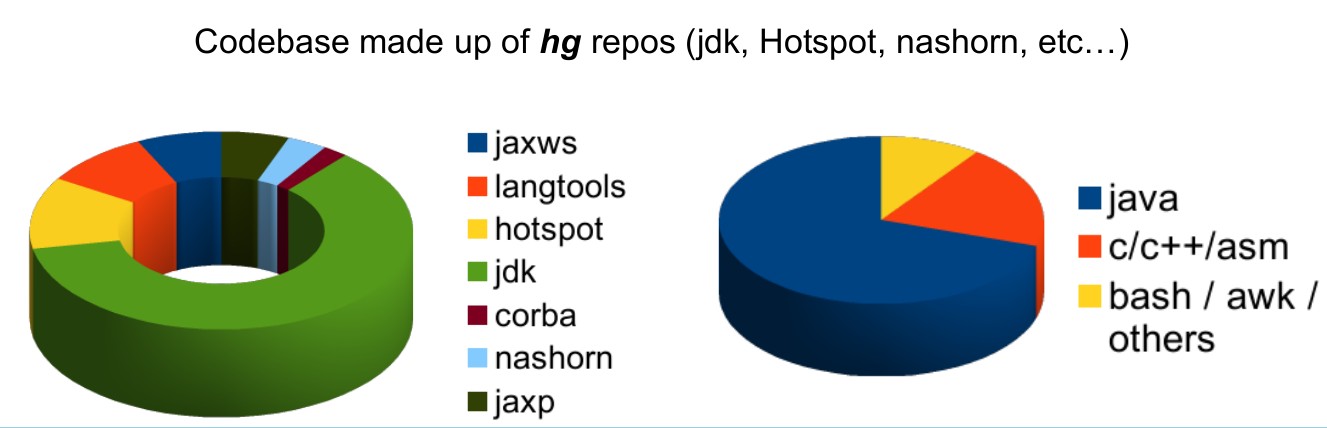
What is OpenJDK made of ?
OpenJDK is made up of a number of repositories, namely corba, hotspot, jaxp, jaxws, jdk, langtools, and nashorn. Between OpenjJDK8 and OpenJDK9 there have been no new repositories introduced, but lots of new changes and restructuring, primarily due to Jigsaw – the modularisation of Java itself [2] [3] [4] [5].
 |
|
repo composition, language breakdown (metrics are estimated)
|
Recent history
OpenJDK Build Benchmarks – build-infra (Nov 2011) by Fredrik Öhrström, ex-Oracle, OpenJDK hero!
Fredrik Öhrström visited the LJC [16] in November 2011 where he showed us how to build OpenJDK on the three major platforms, and also distributed a four page leaflet with the benchmarks of the various components and how long they took to build. The new build system and the new makefiles are a result of the build system being re-written (build-infra).
Below are screen-shots of the leaflets, a good reference to compare our journey:
The New Build System [23]
The New Makefiles [24]
How has Java the language and platform built over the years ?
Java is built by bootstrapping an older (previous) version of Java – i.e. Java is built using Java itself as its building block. Where older components are put together to create a new component which in the next phase becomes the building block. A good example of bootstrapping can be found at Scheme from Scratch [6] or even on Wikipedia [7].
OpenJDK8 [8] is compiled and built using JDK7, similarly OpenJDK9 [9] is compiled and built using JDK8. In theory OpenJDK8 can be compiled using the images created from OpenJDK8, similarly for OpenJDK9 using OpenJDK9. Using a process called bootcycle images – a JDK image of OpenJDK is created and then using the same image, OpenJDK is compiled again, which can be accomplished using a make command option:
$ make bootcycle-images # Build images twice, second time with newly built JDK
make offers a number of options under OpenJDK8 and OpenJDK9, you can build individual components or modules by naming them, i.e.
$ make [component-name] | [module-name]
or even run multiple build processes in parallel, i.e.
$ make JOBS=<n> # Run <n> parallel make jobs
Finally install the built artefact using the install option, i.e.
$ make install
Some myths busted
OpenJDK or Hotspot to be more specific isn’t completely written in C/C++, a good part of the code-base is good ‘ole Java (see the composition figure above). So you don’t have to be a hard-core developer to contribute to OpenJDK. Even the underlying C/C++ code code-base isn’t scary or daunting to look at. For example here is an extract of a code snippet from vm/memory/universe.cpp in the HotSpot repo –
http://hg.openjdk.java.net/jdk6/jdk6/hotspot/raw-file/a541ca8fa0e3/src/share/vm/memory/universe.cpp [10]:
.
.
.
Universe::initialize_heap()

if (UseParallelGC) {
    #ifndef SERIALGC
    Universe::_collectedHeap = new ParallelScavengeHeap();
    #else // SERIALGC
        fatal("UseParallelGC not supported in this VM.");
    #endif // SERIALGC

} else if (UseG1GC) {
    #ifndef SERIALGC
    G1CollectorPolicy* g1p = new G1CollectorPolicy();
    G1CollectedHeap* g1h = new G1CollectedHeap(g1p);
    Universe::_collectedHeap = g1h;
    #else // SERIALGC
        fatal("UseG1GC not supported in java kernel vm.");
    #endif // SERIALGC

} else {
    GenCollectorPolicy* gc_policy;

    if (UseSerialGC) {
        gc_policy = new MarkSweepPolicy();
    } else if (UseConcMarkSweepGC) {
        #ifndef SERIALGC
        if (UseAdaptiveSizePolicy) {
            gc_policy = new ASConcurrentMarkSweepPolicy();
        } else {
            gc_policy = new ConcurrentMarkSweepPolicy();
        }
        #else // SERIALGC
            fatal("UseConcMarkSweepGC not supported in this VM.");
        #endif // SERIALGC
    } else { // default old generation
        gc_policy = new MarkSweepPolicy();
    }

    Universe::_collectedHeap = new GenCollectedHeap(gc_policy);
}
.
.
.
(please note that the above code snippet might have changed since published here)
The things that appears clear from the above code-block are, we are looking at how pre-compiler notations are used to create Hotspot code that supports a certain type of GC i.e. Serial GC or Parallel GC. Also the type of GC policy is selected in the above code-block when one or more GC switches are toggled i.e. UseAdaptiveSizePolicy when enabled selects the Asynchronous Concurrent Mark and Sweep policy. In case of either Use Serial GC or Use Concurrent Mark Sweep GC are not selected, then the GC policy selected is Mark and Sweep policy. All of this and more is pretty clearly readable and verbose, and not just nicely formatted code that reads like English.
Further commentary can be found in the section called Deep dive Hotspot stuff in the Adopt OpenJDK Intermediate & Advance experiences [11] document.
Steps to build your own JDK or JRE
Earlier we mentioned about JDK and JRE images – these are no longer only available to the big players in the Java world, you and I can build such images very easily. The steps for the process have been simplified, and for a quick start see the Adopt OpenJDK Getting Started Kit [12] and Adopt OpenJDK Intermediate & Advance experiences [11] documents. For detailed version of the same steps, please see the Adopt OpenJDK home page [13]. Basically building a JDK image from the OpenJDK code-base boils down to the below commands:
(setup steps have been made brief and some commands omitted, see links above for exact steps)
$ hg clone http://hg.openjdk.java.net/jdk8/jdk8 jdk8 (a)...OpenJDK8
or
$ hg clone http://hg.openjdk.java.net/jdk9/jdk9 jdk9 (a)...OpenJDK9
$ ./get_source.sh (b)
$ bash configure (c)
$ make clean images (d)
(setup steps have been made brief and some commands omitted, see links above for exact steps)
To explain what is happening at each of the steps above:
(a) We clone the openjdk mercurial repo just like we would using git clone ….
(b) Once we have step (a) completed, we change into the folder created, and run the get_source.sh command, which is equivalent to a git fetch or a git pull, since the step (a) only brings down base files and not all of the files and folders.
(c) Here we run a script that checks for and creates the configuration needed to do the compile and build process
(d) Once step (c) is success we perform a complete compile, build and create JDK and JRE images from the built artefacts
As you can see these are dead-easy steps to follow to build an artefact or JDK/JRE images [step (a) needs to be run only once].
Benefits
– contribute to the evolution and improvement of the Java the language & platform
– learn about the internals of the language and platform
– learn about the OS platform and other technologies whilst doing the above
– get involved in F/OSS projects
– stay on top the latest changes in the Java / JVM sphere
– knowledge and experience that helps professionally but also these are not readily available from other sources (i.e. books, training, work-experience, university courses, etcetera).
– advancement in career
– personal development (soft skills and networking)
Contribute
Join the Adopt OpenJDK [13] and Betterrev [15] projects and contribute by giving us feedback about everything Java including these projects. Join the Adoption Discuss mailing list [14] and other OpenJDK related mailing lists to start with, these will keep you updated with latest progress and changes to OpenJDK. Fork any of the projects you see and submit changes via pull-requests.
Thanks and support
Adopt OpenJDK [13] and umbrella projects have been supported and progressed with help of JCP [21], the Openjdk team [22], JUGs like London Java Community [16], SouJava [17] and other JUGs in Brazil, a number of JUGs in Europe i.e. BGJUG (Bulgarian JUG) [18], BeJUG (Belgium JUG) [19], Macedonian JUG [20], and a number of other small JUGs. We hope in the coming time more JUGs and individuals would get involved. If you or your JUG wish to participate please get in touch.
—-
Credits
Special thanks to +Martijn Verburg (incepted Adopt OpenJDK),+Richard Warburton, +Oleg Shelajev, +Mite Mitreski, +Kaushik Chaubal and +Julius G for helping improve the content and quality of this post, and sharing their OpenJDK experience with us.
—-
How to get started ?
Join the Adoption Discuss mailing list [14], go to the Adopt OpenJDK home page [13] to get started, followed by referring to the Adopt OpenJDK Getting Started Kit [12] and Adopt OpenJDK Intermediate & Advance experiences [11] documents.
Please share your comments here or tweet at @theNeomatrix369.
Resources
[8] OpenJDK8
[9] OpenJDK9
[13] Adopt OpenJDK home page
[14] Adoption Discuss
[15] Betterrev
[17] SouJava
[19] BeJUG (Belgium JUG)
[20] Macedonian JUG
[22] OpenJDK team
[23] The New Build System
[24] The New Makefiles
This post is part of the Java Advent Calendar and is licensed under the Creative Commons 3.0 Attribution license. If you like it, please spread the word by sharing, tweeting, FB, G+ and so on!
Hotspot™ is in focus again -aka- Hacking Hotspot™ in Eclipse Juno under Ubuntu 12.04!
News, introduction and a bit of History
Hotspots, sunspots, solar flares et al have been in the news since the last few months, first a major one in November 2012, followed by another one in January 2013.
 Whilst I have your attention on this topic, did you know the JVM (Java Virtual Machine) also goes by the name Hotspot™, find out why it is called so! HotSpot. Unlike the sun’s solar hotspots, the JVM i.e. Hotspot™ is a much gentler entity! With the new build system i.e. build-infra it is now possible to build and run Hotspot from within Eclipse in a matter of minutes. Further you can even launch your own java-based program using gamma – the Hotspot launcher.
The steps are similar to that of building it via the command-line interface (CLI) – but with the advantage of being able to Run and Debug any line in the Hotspot source-code (it is a C/C++ based component of the OpenJDK project). You can also pass in the same arguments as you would to the java command-line.
In this blog we will cover the following in two parts, a simple import-build-run steps for busy readers (first 8 to 9 sections) followed by a simple hack-build-run-examine (the additional sections) for ones with more spare time in hand:
Building the latest version of OpenJDK locally
Installing Eclipse Juno under Ubuntu 12.04
Importing the C/C++ Hotspot project into Eclipse Juno
Downloading the Hotspot ready-to-go project files (and supporting script files)
Applying the downloaded files to the imported Eclipse project files
Running Eclipse with the Hotspot project loaded
Building Hotspot from within Eclipse
Running Hotspot from within EclipseHacking the java.c program – add your own code to it
Running Hotspot (and loading a simple Demo class) from within Eclipse
Putting breakpoints in java.c within Eclipse
Tracing code and inspecting variables in java.c within Eclipse
Examining the different logs generated during the build and Run/Debug launching processes
Most of these sections will have screen-shots to illustrate the actions to be taken to achieve the results. We cover only basic aspects of the topic so advanced topics won’t be covered here. Having said that it is a step up from the Old Build system, as in the new Build-infra incremental builds have made things faster.
Pre-requisites
The below programs and environments are required, including basic operational knowledge and understanding of them:
Eclipse Juno
Eclipse CDT 6.0
Ubuntu 12.04 (CLI & GUI familiarity)
OpenJDK 8 (a version that builds)
OpenJDK 7 or Java / Javac 7.0 (JRE/JDK 1.7.013 – at the time of writing)
Any class or jar that can be run using the java command.
Basic knowledge of C/C++ (if you are going to make changes to Hotspot)
Basic knowledge of Bash scripting
Building the latest version of OpenJDK locally
In order to download and install the latest OpenJDK system, follow build instructions at http://java.net/projects/adoptopenjdk/pages/AdoptOpenJDKVMBuild.
Installing Eclipse Juno under Ubuntu 12.04
Please ensure you do not have a previous installation of Eclipse on your system, if you do uninstall it before performing the below instructions.
Find out whether you are running a 32- or 64-bits system with the below command:
$ file /bin/bash
Sample output indicating the platform of the system
/bin/bash: ELF 32-bit LSB executable, Intel 80386, version 1 (SYSV), dynamically linked (uses shared libs), for GNU/Linux 2.6.24, BuildID[sha1]=0xf199a4a89ac968c2e0e99f2410600b9d7e995187, stripped
Quick method
Download the script that does that automatically for us:
$ wget http://bit.ly/YBS8ARRun it with the correct platform parameter using the feedback from the previous step:
$ bash installEclipseJunoCDTForUbuntu12.04.sh 32
or
$ bash installEclipseJunoCDTForUbuntu12.04.sh 64To create a icon in the Unity Dashboard, etc… please refer to the last section of the original blog
— OR —
Step-by-step method
Go to the downloads folder under your $HOME directory:
$ cd ~/Downloads
Download the necessary Eclipse Juno CDT package
32 bits
$ wget http://bit.ly/11QStqT
– or –
64 bits
$ wget http://bit.ly/WSadhy
Untar the downloaded file:
32 bits
$ tar -zxvf eclipse-cpp-juno-SR1-linux-gtk.tar.gz
– or –
64 bits
$ tar -zxvf eclipse-cpp-juno-SR1-linux-gtk-x86_64.tar.gz
This results in a folder named “eclipse”, which should be copied to /opt with
$ sudo mv “eclipse” /opt
Now add a link to the executable in /usr/bin to “/opt/eclipse/eclipse” for easier access.
$ sudo ln -s “/opt/eclipse/eclipse” /usr/bin/eclipse
To do the rest of the optional steps i.e. create a icon in the Unity Dashboard, etc… please refer to the last section of the original blog.
Importing the C/C++ Hotspot project into Eclipse Juno
Run Eclipse
Make it a point to create your own Eclipse workspace for OpenJDK projects calling it something like ‘Eclipse_OpenJDK_Projects’ (without quotes).

File > Import… > select a import source > Existing Code as Makefile Project
Select the hotspot project from the hotspot sub-folder
Select ‘Cross GCC’ as the Toolchain

Once imported, the hotspot project appears in the Project Explorer panel at the left-hand-side.

Now shutdown Eclipse.
Downloading the Hotspot ready-to-go project files (and supporting script files)
Go to the command-prompt and navigate to where the ‘hotspot’ folder is situated (i.e. ~/sources/jdk8_tl/hotspot).
Run this command at the CLI:
$ wget http://bit.ly/Vreesk
Download takes under a minute and the download progress bar should show 100%.
Applying the downloaded files to the imported Eclipse project files
Run the below command from within the hotspot folder:
$ bash downloadEclipseProjectFiles.sh ~/Eclipse_OpenJDK_Projects ~/Eclipse_OpenJDK_Projects/
Once all the scripts and supporting files are downloaded the following visible and hidden files and folders should become available:
.cproject (hidden)
.project (hidden)
.settings (hidden)
.metadata (moved to destination)
eclipseScripts
The local copies of .cproject and .project will be overwritten by the above action, along with that the .metadata folder in the Eclipse workspace for the project will also be updated.
Navigate to the eclipseScripts folder and run:
$ bash runEclipseForHotspot.sh ~/Eclipse_OpenJDK_Projects
This should launch Eclipse and take you to your imported project (always launch Eclipse via the script file).
Building Hotspot from within Eclipse
Select the project in the Project Explorer and select the menu option Project > Build Project (in case of first-time build from within Eclipse, please do a Clean Build from within Eclipse before doing a full-build).
Now shutdown Eclipse.
Restart Eclipse using the script mentioned in the above section (see Applying the downloaded…), always launch Eclipse via this script file.
Select the project in the Project Explorer and select the menu option Project > Build Project.
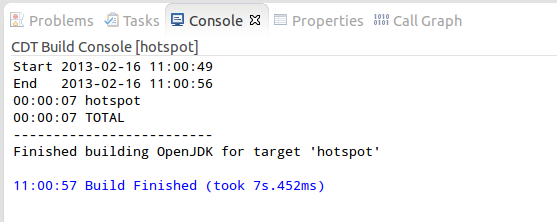
A successful build will result in messages in the build output console:
Running Hotspot from within Eclipse
Select the ‘hotspot’ project from the Project Explorer and select the menu option Run > Run.
Basically running ‘gamma’ through the Eclipse Run/Debug launcher should print out the gamma usage screen which looks like the below (snapshot) and exactly the same as the ‘java –help’ command run from the command prompt:
[Loaded sun.misc.Launcher$AppClassLoader$1 from shared objects file]
[Loaded java.lang.SystemClassLoaderAction from shared objects file]
Usage: gamma [-options] class [args...]
           (to execute a class)
   or  gamma [-options] -jar jarfile [args...]
           (to execute a jar file)

where options include:
    -cp <class search path of directories and zip/jar files>
    -classpath <class search path of directories and zip/jar files>
                  A : separated list of directories, JAR archives,
                  and ZIP archives to search for class files.
.
.
.
[Loaded java.lang.Shutdown from shared objects file]
[Loaded java.lang.Shutdown$Lock from shared objects file]
See section “Examining all kinds of logs…” for a detailed version of the above snapshot of the log.
_______________________________________________________________________________________________________________________________________________________________________________
Hacking the java.c program – add your own code to it
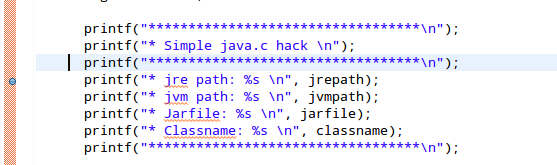
The C/C++ code in Hotspot, in this case java.c (found in the hotspot/src/share/launcher folder) isn’t as scary as C/C++ code can be deemed to be – I hope it removes such a phobia about system-level languages. Locate hotspot/src/share/launcher/java.c in Eclipse, open it and go to the section of the code between line numbers 388 and 389 and insert the below block of code:
      printf("**********************************\n");
      printf("* Simple java.c hack \n");
      printf("**********************************\n");
      printf("* jre path: %s \n", jrepath);
      printf("* jvm path: %s \n", jvmpath);
      printf("* Jarfile: %s \n", jarfile);
      printf("* Classname: %s \n", classname);
      printf("**********************************\n");
which on completion should look like:

Running Hotspot (and loading a simple Demo class) from within Eclipse
If you don’t have a sample class or jar to hand, create one, here is a snapshot of the code behind the demo HelloWorld.java program:
public class HelloWorld {
    public static void main(String[] args) {
        System.out.println("************************");
        System.out.println("*     Hello, World     *");
        System.out.println("************************");
    }
}
Save this program say in the $HOME folder, then edit ../hotspot/eclipseScripts/updateEnvVarsForEclipseForHotspot.sh to enable passing the HelloWorld or any other class to the hotspot program’s Run/Debug Launcher – instructions in the file, look for the below block of code (comment and uncomment the relevant lines). If another name or location is chosen for the demo class or program, then make the necessary amendment in the above script file – comments available in the file to guide you (see below).
# Uncomment this line when you have a sample class or jar to pass to gamma
# export DEMOCLASS_OR_JAR_ARG="-cp $HOME HelloWorld"

# This will invoke gamma to display the usage screen
export DEMOCLASS_OR_JAR_ARG=""
}
Restart Eclipse using the script mentioned in the above section (see Applying the downloaded…), always launch Eclipse via this script file.
The above lines should produce the below output (snapshot) between two blocks of verbose messages from gamma, which also contains the print messages to the console that were inserted into the java.c unit:
Using java runtime at: /usr/lib/jvm/java-7-openjdk-i386/jre/
**********************************
* Simple java.c hack
**********************************
* jre path: /usr/lib/jvm/java-7-openjdk-i386/jre/
* jvm path: /home/saiubuntu/sources/jdk8_tl/build/linux-x86-normal-server-release/hotspot/linux_i486_compiler2/product/libjvm.so
* Jarfile: (null)
* Classname: HelloWorld
**********************************
[Loaded java.lang.Object from shared objects file]
[Loaded java.io.Serializable from shared objects file]
.
.
.
************************
*     Hello, World     *
************************
[Loaded java.lang.Shutdown from shared objects file]
[Loaded java.lang.Shutdown$Lock from shared objects file]
See the below section on “Examining all kinds of logs…” for a detailed version of the above snapshot.
Putting breakpoints in java.c within Eclipse
Open java.c in the Eclipse editor, position the cursor on line 392 (or any other line) and double click on the left-hand-side border/bevel of the editor window:
Tracing code and inspecting variables in java.c within Eclipse
Now select the project in the Project Explorer and run the program in Debug mode by clicking on the menu option Run > Debug to launch the Debug perspective:

Adding a Watch Expression and Tracing through the lines of code shows the current value being populated in the Watch Expression window (top right corner). A watch expression can be added by merely select the field or variable in the editor, right-mouse click and selecting Watch Expression from the pop-up menu:

Examining the different logs generated during the build and Run/Debug launching processes
A number of log files were created during the whole process and can be examined, see below (the names of the files describe their contents):
hotspot.eclipse.clean.build.log (console messages generated on Clean Hotspot Build action)
hotspot.eclipse.full.build.log (console messages generated on Full Hotspot Build action)
hotspot.eclipse.incremental.build.log (console messages generated on Incremental Hotspot Build action)
gamma.run_or_debug.Usage.output.log (console messages generated on running gamma in verbose mode, and not launching any program)
gamma.run_or_debug.HelloWorld.Verbose.output.log (console messages generated on running gamma in verbose mode, and launching the HelloWorld program)
A number of advanced hacks (assignment for readers!)
1) Insert debug-level log messages into java.c throughout the unit, rebuild gamma and run the Demo class or any other java-based.
2) Refactor java.c and insert debug-level log messages throughout the unit, rebuild gamma and run the Demo class or any other java-based program.
3) After step 2) above, load a low-latency, GC-tuned java based program, with GC-logs enabled and examine the GC-logs produced, to see if there is any change in performance (for performance tuning buffs).
4) Apply the Elvis operator to javac (a good way to get exposure to ‘how to modify javac?’) and compile a java program with the Elvis operator implemented in it.
5) GC-fun: replace the existing garbage collector(s) with a custom one. Resurrect PermGen or iCMS in the existing code. Add your change you always wanted to, to the existing version of Hotspot (for GC buffs).
6) Change javac to be able to parse and compile new language features or understand another dialect of JVM-based languages or maybe even older programming languages like C, Assembly, Scheme or Smalltalk.
7) Replace the built-in class-loader with your custom version.
References
(1) OpenJDK: README for the New Build System
(2) Hotspot Runtime Overview
(3) HotSpot Internals
(4) Hotspot Docs
(5) OpenJDK build instructions (old build)
(6) Hacking Hotspot in Eclipse – Roman Kennke (old build system)
(7) Biased Locking in HotSpot
(8) HotSpot source: command line arguments
(9) Memory leak profiling with netbeans
(10) HotSpot Tools – HotSpot Internals for OpenJDK – Oracle Wiki
(11) HotSpot development on Linux with NetBeans
(12) Building Hotspot in Eclipse under Ubuntu 12.04 (Old Build system)
Related references
Read about the Adopt OpenJDK program at the the Adopt OpenJDK java.net project website. Join the Adopt OpenJDK mailing list at the google group or send an email to adopt-openjdk@googlegroups.com to subscribe to the mailing list. Find out how to join a Google group.
@adoptopenjdk – follow us on twitter, get the latest Adopt OpenJDK community news!Read about the Adopt-a-JSR program at the java.net project website. Join the Adopt-a-JSR mailing list at the java.net mailing list. Send an email to members@adoptajsr.java.net to subscribe to the mailing list.
@adoptajsr – follow us on twitter, get the latest Adopt-a-JSR community news!
Finally
These instructions will be converted to much compact ‘wiki’ instructions without any of the narrations explanations as mentioned in the blog above – “post any feedback and improvements from the users of the instructions!”. You can post them at the bottom of this blog or tweet them to me at @theNeomatrix369.
‘Thank you’ to those who have helped in the process (@karianna, @RichardWarburto, Girish Balakrishnan, @teozaurus, @SamirTalwar, @sandromancuso and @stPundit). Any (constructive) comments or request for changes are welcome.
I have learnt a lot about the topics covered here i.e. Java, Eclipse and Ubuntu! For those who wish to dive deeper in Hotspot and Java, make use of all the links in the blog, study the bash scripts written to automate the process, above all look into the hotspot folder and take interest in all the files it contains.
Feel free to approach the list of ‘assignment’ hacks, I’ll be more than happy to add links from here to your page if you accomplish any one of them. You will also be mentioned in our community news relayed regularly.

Post #fosdem, #jfokus – lots more #java, #jsr & #openjdk news from all over!
In the last couple of weeks since FOSDEM 2013, Jfokus 2013 and, events and hackdays organised by LJC JUG members, we have had a lots of exciting news and resources to share with you. The source of the information have been mailing lists / forums, meetup events, twitter and other sources.
Plenty were spoken about #java, #jsr and #openjdk, the topics covered by the #adoptajar and #adoptopenjdk programs.
FOSDEM 2013
- The OpenJDK and JSR topics get good coverage at FOSDEM 2013! JUG members participating!
- FOSDEM 2013 Lightening talk videos
Speaker interviews:
- https://fosdem.org/2013/interviews/
- https://fosdem.org/2013/news/2013-01-31-last-set-of-speaker-interviews/
Jfokus 2013
#Jfokus coverage of #java, a snapshot by Kevin Farnham:
- Monday at Jfokus 2013: Tutorials and Hands-On Labs
- Tuesday at Jfokus 2013: Intro, a New Java Champion, Jfokus Embedded Launch, Keynotes, Technical Sessions, Buffet, and BOFs
- Wednesday at Jfokus 2013: Then Was Then, Now Is Now, It’s Time to Be Smart (Jonas Bonér and the Final Jfokus Embedded Sessions)
- Video & archive for 2013 to feature soon !
@steveonjava – Nighthacking!
Watch all the recordings of Steve’s Nighthacking from FOSDEM 2013 through to Jfokus 2013!
LJC events & hackdays
Garbage collection – The useful parts
WebSocket & JSON Hack Day (covering implementation for JSR 356 & JSR 353)
- Meetup event
- Recorded presentation
- Slides
- Github (JSR-353-JSON artefact: https://github.com/Adopt-a-JSR/JSR-353-JSON; JSR-356-WebSocketAPI to follow soon!)
- David’s github link: https://github.com/davidillsley/json-workshop
- JSR-353 (JSON): http://glassfish.java.net/adoptajsr/jsr353.html (http://json-processing-spec.java.net/)
- JSR-356 (Websocket): http://glassfish.java.net/adoptajsr/jsr356.html (http://websocket-spec.java.net/)
Bring your Performance Problems Panel
@adoptajsr news feed
– Plenty of updates on polls, JSRs, presentations, github projects, etc… were discussed on twitter.
– WebSocket & JSON Hack Day (covering implementation for JSR 356 & JSR 353) – see above!
– Suggestion to extend / improve the Java API – Thanks Hildeberto Mendonça for coming forward to contribute!
– Modernize Connector/MDB — Vote and comment – Thanks Richard Kolb for support such initiatives!
– CDI 1.1 applications you can work with – Thanks Luigi for the contribution!
@adoptopenjdk news feed
– Updates on latest changes and developments in the OpenJDK world that were discussed amongs members on twitter.
– Potential plans to deprecate SPARC V8 support in HotSpot!
– StringBuffer to StringBuilder again – discussions rekindled!
Upcoming events and meetings
Adopt-a-JSR online meeting – February 27
Further hackdays, discussion panels and events to be organised by LJC JUG members.
26-27 March 2013, Devoxx UK
—-
Read about the Adopt OpenJDK program at the the Adopt OpenJDK java.net project website.
Join the Adopt OpenJDK mailing list at the google group. Find out how to join a Google group or send an email to adopt-openjdk@googlegroups.com to subscribe to the mailing list.
Read about the Adopt-a-JSR program at the java.net project website.
Join the Adopt-a-JSR mailing list at the java.net mailing list. Send an email to members@adoptajsr.java.net to subscribe to the mailing list.
The OpenJDK and JSR topics get good coverage at FOSDEM 2013! JUG members participating!
Its FOSDEM (Free and Open source Software Developers’ European Meeting) time again, and this year we have very good coverage on the OpenJDK and JSR topics at FOSDEM 2013. A number of speakers and events are taking place throughout the two days covering various topics on Java.
Adopt-a-JSR and JSRs
The speakers and events for these topics will speak on the present state and the future of Java, technical topics like InvokeDynamics, Zero, and the Shark compiler. The new JSR for Hotspot/JVM that will affect the Android world i.e. Dalvik users! Below are a list of speakers and events covered under this topic.
Speakers
Events
Adopt OpenJDK / OpenJDK
The OpenJDK topic has got massive coverage with 17 speakers, speaking and holding events covering various topics. In summary the topics covered will be:
– Past and future of OpenJDK, new releases
– Q & A session on OpenJDK
– The OpenJDK journey and what has been learnt so far
– Porting OpenJDK to PowerPC/AIX, AArch64
– Running Nashorn and JavaJFX
– OpenJDK7u progress
– Highlight on OpenJDK Lambda
– Using Shark again
Below are a list of speakers and events covered under this topic.
Speakers
Events
Java gets its own space in the Free Java (Dev Room).
Members of the LJC JUG, CEJUG, Brussels JUG and other JUGs worldwide will be present at this event!
Follow the event on Twitter by following the below handles:
@fosdem
@adoptopenjdk
@adoptajsr
FOSDEM website: https://fosdem.org/2013/
Events schedule: https://fosdem.org/2013/schedule/events/
Speaker Interview: https://fosdem.org/2013/interviews/
Read about the Adopt OpenJDK program at the the Adopt OpenJDK java.net project website.
Join the Adopt OpenJDK mailing list at the google group or send an email to adopt-openjdk@googlegroups.com to subscribe to the mailing list. Find out how to join a Google group.
Read about the Adopt-a-JSR program at the java.net project website.
Join the Adopt-a-JSR mailing list at the java.net mailing list. Send an email to members@adoptajsr.java.net to subscribe to the mailing list.
(function(){
var b, a;
b=document.createElement(“script”);
b.src=”//a1.vdna-assets.com/analytics.js”;
b.async=true;
a=document.getElementsByTagName(“head”)[0];
a.insertBefore(b,a.firstChild);
this.VDNA=this.VDNA||{};
this.VDNA.queue=this.VDNA.queue||[];
}());
VDNA.queue.push({ apiKey : “individual1370625757899”, method : “reportPageView”});
