Hotspot™ is in focus again -aka- Hacking Hotspot™ in Eclipse Juno under Ubuntu 12.04!

News, introduction and a bit of History

Hotspots, sunspots, solar flares et al have been in the news since the last few months, first a major one in November 2012, followed by another one in January 2013.Solar flares from the Sun - August 2012 Java Hotspot Whilst I have your attention on this topic, did you know the JVM (Java Virtual Machine) also goes by the name Hotspot™, find out why it is called so! HotSpot. Unlike the sun’s solar hotspots, the JVM i.e. Hotspot™ is a much gentler entity! With the new build system i.e. build-infra it is now possible to build and run Hotspot from within Eclipse in a matter of minutes. Further you can even launch your own java-based program using gamma – the Hotspot launcher.

The steps are similar to that of building it via the command-line interface (CLI) – but with the advantage of being able to Run and Debug any line in the Hotspot source-code (it is a C/C++ based component of the OpenJDK project). You can also pass in the same arguments as you would to the java command-line.


In this blog we will cover the following in two parts, a simple import-build-run steps for busy readers (first 8 to 9 sections) followed by a simple hack-build-run-examine (the additional sections) for ones with more spare time in hand:


Building the latest version of OpenJDK locally
Installing Eclipse Juno under Ubuntu 12.04
Importing the C/C++ Hotspot project into Eclipse Juno
Downloading the Hotspot ready-to-go project files (and supporting script files)
Applying the downloaded files to the imported Eclipse project files
Running Eclipse with the Hotspot project loaded
Building Hotspot from within Eclipse
Running Hotspot from within Eclipse

Hacking the java.c program – add your own code to it
Running Hotspot (and loading a simple Demo class) from within Eclipse
Putting breakpoints in java.c within Eclipse
Tracing code and inspecting variables in java.c within Eclipse
Examining the different logs generated during the build and Run/Debug launching processes

Most of these sections will have screen-shots to illustrate the actions to be taken to achieve the results. We cover only basic aspects of the topic so advanced topics won’t be covered here. Having said that it is a step up from the Old Build system, as in the new Build-infra incremental builds have made things faster.

Pre-requisites

The below programs and environments are required, including basic operational knowledge and understanding of them:

Eclipse Juno
Eclipse CDT 6.0
Ubuntu 12.04 (CLI & GUI familiarity)
OpenJDK 8 (a version that builds)
OpenJDK 7 or Java / Javac 7.0 (JRE/JDK 1.7.013 – at the time of writing)
Any class or jar that can be run using the java command.
Basic knowledge of C/C++ (if you are going to make changes to Hotspot)
Basic knowledge of Bash scripting


Building the latest version of OpenJDK locally

In order to download and install the latest OpenJDK system, follow build instructions at http://java.net/projects/adoptopenjdk/pages/AdoptOpenJDKVMBuild.


Installing Eclipse Juno under Ubuntu 12.04

Please ensure you do not have a previous installation of Eclipse on your system, if you do uninstall it before performing the below instructions.

Find out whether you are running a 32- or 64-bits system with the below command:

$ file /bin/bash

Sample output indicating the platform of the system
/bin/bash: ELF 32-bit LSB executable, Intel 80386, version 1 (SYSV), dynamically linked (uses shared libs), for GNU/Linux 2.6.24, BuildID[sha1]=0xf199a4a89ac968c2e0e99f2410600b9d7e995187, stripped

Quick method

Download the script that does that automatically for us:
$ wget http://bit.ly/YBS8AR

Run it with the correct platform parameter using the feedback from the previous step:
$ bash installEclipseJunoCDTForUbuntu12.04.sh 32
or
$ bash installEclipseJunoCDTForUbuntu12.04.sh 64

To create a icon in the Unity Dashboard, etc… please refer to the last section of the original blog

— OR —

Step-by-step method

Go to the downloads folder under your $HOME directory:

$ cd ~/Downloads

Download the necessary Eclipse Juno CDT package

32 bits
$ wget http://bit.ly/11QStqT
– or –
64 bits
$ wget http://bit.ly/WSadhy

Untar the downloaded file:

32 bits
$ tar -zxvf eclipse-cpp-juno-SR1-linux-gtk.tar.gz
– or –
64 bits
$ tar -zxvf eclipse-cpp-juno-SR1-linux-gtk-x86_64.tar.gz

This results in a folder named “eclipse”, which should be copied to /opt with

$ sudo mv “eclipse” /opt

Now add a link to the executable in /usr/bin to “/opt/eclipse/eclipse” for easier access.

$ sudo ln -s “/opt/eclipse/eclipse” /usr/bin/eclipse

To do the rest of the optional steps i.e. create a icon in the Unity Dashboard, etc… please refer to the last section of the original blog.


Importing the C/C++ Hotspot project into Eclipse Juno

Run Eclipse

Make it a point to create your own Eclipse workspace for OpenJDK projects calling it something like ‘Eclipse_OpenJDK_Projects’ (without quotes).
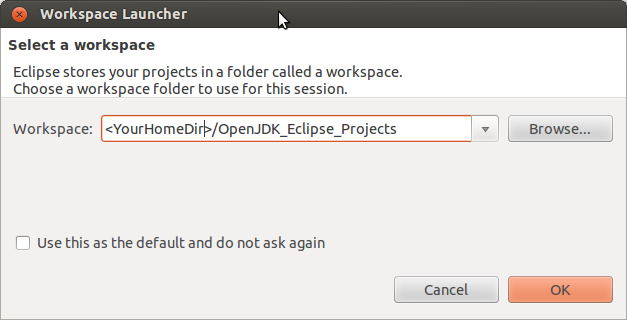
1. WorkspaceLauncher - select your OpenJDK workspace

File > Import… > select a import source > Existing Code as Makefile Project
Select the hotspot project from the hotspot sub-folder
Select ‘Cross GCC’ as the Toolchain
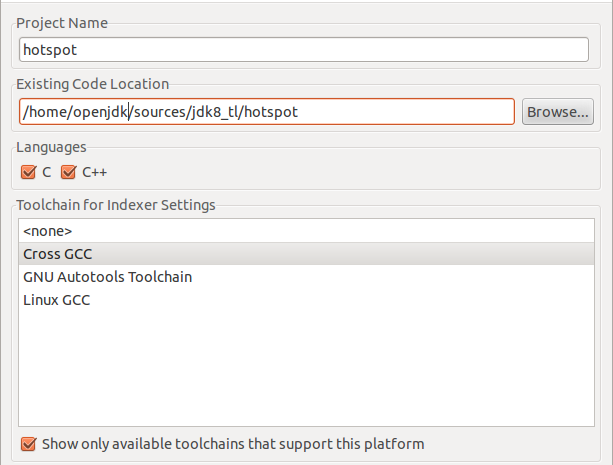
2. ImportExistingCode

Once imported, the hotspot project appears in the Project Explorer panel at the left-hand-side.
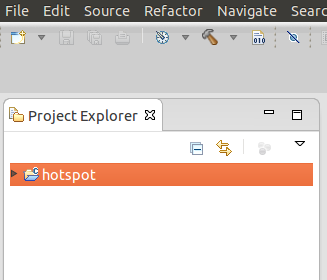
3. ProjectExplorerOnceImported
Now shutdown Eclipse.


Downloading the Hotspot ready-to-go project files (and supporting script files)

Go to the command-prompt and navigate to where the ‘hotspot’ folder is situated (i.e. ~/sources/jdk8_tl/hotspot).

Run this command at the CLI:

$ wget http://bit.ly/Vreesk

Download takes under a minute and the download progress bar should show 100%.


Applying the downloaded files to the imported Eclipse project files

Run the below command from within the hotspot folder:

$ bash downloadEclipseProjectFiles.sh ~/Eclipse_OpenJDK_Projects ~/Eclipse_OpenJDK_Projects/

Once all the scripts and supporting files are downloaded the following visible and hidden files and folders should become available:

.cproject (hidden)
.project (hidden)
.settings (hidden)
.metadata (moved to destination)
eclipseScripts

The local copies of .cproject and .project will be overwritten by the above action, along with that the .metadata folder in the Eclipse workspace for the project will also be updated.

Navigate to the eclipseScripts folder and run:

$ bash runEclipseForHotspot.sh ~/Eclipse_OpenJDK_Projects

This should launch Eclipse and take you to your imported project (always launch Eclipse via the script file).


Building Hotspot from within Eclipse

Select the project in the Project Explorer and select the menu option Project > Build Project (in case of first-time build from within Eclipse, please do a Clean Build from within Eclipse before doing a full-build).
Now shutdown Eclipse.

Restart Eclipse using the script mentioned in the above section (see Applying the downloaded…), always launch Eclipse via this script file.

Select the project in the Project Explorer and select the menu option Project > Build Project.
A successful build will result in messages in the build output console:
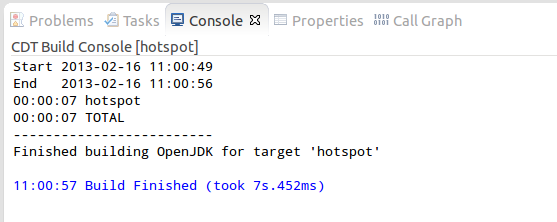
BuildConsoleOuput


Running Hotspot from within Eclipse

Select the ‘hotspot’ project from the Project Explorer and select the menu option Run > Run.

Basically running ‘gamma’ through the Eclipse Run/Debug launcher should print out the gamma usage screen which looks like the below (snapshot) and exactly the same as the ‘java –help’ command run from the command prompt:

[Loaded sun.misc.Launcher$AppClassLoader$1 from shared objects file]
[Loaded java.lang.SystemClassLoaderAction from shared objects file]
Usage: gamma [-options] class [args...]
           (to execute a class)
   or  gamma [-options] -jar jarfile [args...]
           (to execute a jar file)

where options include:
    -cp <class search path of directories and zip/jar files>
    -classpath <class search path of directories and zip/jar files>
                  A : separated list of directories, JAR archives,
                  and ZIP archives to search for class files.
.
.
.
[Loaded java.lang.Shutdown from shared objects file]
[Loaded java.lang.Shutdown$Lock from shared objects file]

See section “Examining all kinds of logs…” for a detailed version of the above snapshot of the log.

_______________________________________________________________________________________________________________________________________________________________________________

Hacking the java.c program – add your own code to it

The C/C++ code in Hotspot, in this case java.c (found in the hotspot/src/share/launcher folder) isn’t as scary as C/C++ code can be deemed to be – I hope it removes such a phobia about system-level languages. Locate hotspot/src/share/launcher/java.c in Eclipse, open it and go to the section of the code between line numbers 388 and 389 and insert the below block of code:

      printf("**********************************\n");
      printf("* Simple java.c hack \n");
      printf("**********************************\n");
      printf("* jre path: %s \n", jrepath);
      printf("* jvm path: %s \n", jvmpath);
      printf("* Jarfile: %s \n", jarfile);
      printf("* Classname: %s \n", classname);
      printf("**********************************\n");

which on completion should look like:
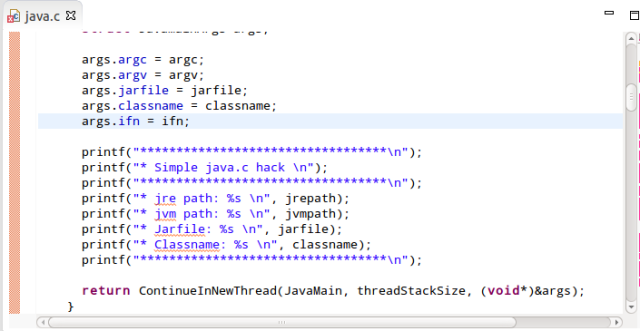
5. java.c.hacking


Running Hotspot (and loading a simple Demo class) from within Eclipse

If you don’t have a sample class or jar to hand, create one, here is a snapshot of the code behind the demo HelloWorld.java program:

public class HelloWorld {
    public static void main(String[] args) {
        System.out.println("************************");
        System.out.println("*     Hello, World     *");
        System.out.println("************************");
    }
}

Save this program say in the $HOME folder, then edit ../hotspot/eclipseScripts/updateEnvVarsForEclipseForHotspot.sh to enable passing the HelloWorld or any other class to the hotspot program’s Run/Debug Launcher – instructions in the file, look for the below block of code (comment and uncomment the relevant lines). If another name or location is chosen for the demo class or program, then make the necessary amendment in the above script file – comments available in the file to guide you (see below).

# Uncomment this line when you have a sample class or jar to pass to gamma
# export DEMOCLASS_OR_JAR_ARG="-cp $HOME HelloWorld"

# This will invoke gamma to display the usage screen
export DEMOCLASS_OR_JAR_ARG=""
}

Restart Eclipse using the script mentioned in the above section (see Applying the downloaded…), always launch Eclipse via this script file.

The above lines should produce the below output (snapshot) between two blocks of verbose messages from gamma, which also contains the print messages to the console that were inserted into the java.c unit:

Using java runtime at: /usr/lib/jvm/java-7-openjdk-i386/jre/
**********************************
* Simple java.c hack
**********************************
* jre path: /usr/lib/jvm/java-7-openjdk-i386/jre/
* jvm path: /home/saiubuntu/sources/jdk8_tl/build/linux-x86-normal-server-release/hotspot/linux_i486_compiler2/product/libjvm.so
* Jarfile: (null)
* Classname: HelloWorld
**********************************
[Loaded java.lang.Object from shared objects file]
[Loaded java.io.Serializable from shared objects file]
.
.
.
************************
*&nbsp;&nbsp;&nbsp;&nbsp;&nbsp;Hello, World&nbsp;&nbsp;&nbsp;&nbsp;&nbsp;*
************************
[Loaded java.lang.Shutdown from shared objects file]
[Loaded java.lang.Shutdown$Lock from shared objects file]

See the below section on “Examining all kinds of logs…” for a detailed version of the above snapshot.


Putting breakpoints in java.c within Eclipse

Open java.c in the Eclipse editor, position the cursor on line 392 (or any other line) and double click on the left-hand-side border/bevel of the editor window:
7. ToggleBreakpointsInJava.C


Tracing code and inspecting variables in java.c within Eclipse

Now select the project in the Project Explorer and run the program in Debug mode by clicking on the menu option Run > Debug to launch the Debug perspective:
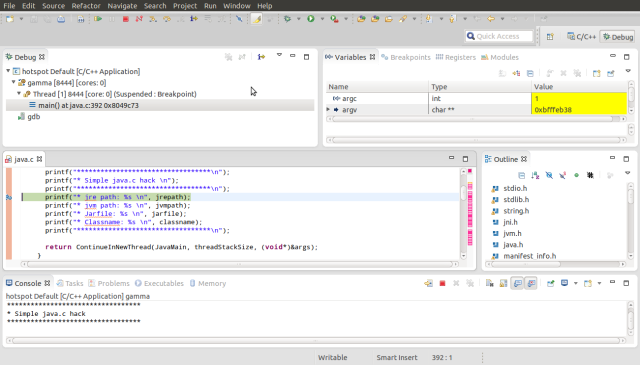
EclipseHotspotDebugBreakpoint

Adding a Watch Expression and Tracing through the lines of code shows the current value being populated in the Watch Expression window (top right corner). A watch expression can be added by merely select the field or variable in the editor, right-mouse click and selecting Watch Expression from the pop-up menu:
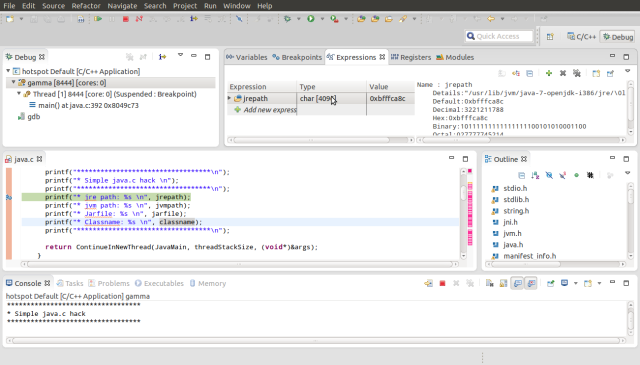
EclipseHotspotWatchExpressionDebugMode


Examining the different logs generated during the build and Run/Debug launching processes

A number of log files were created during the whole process and can be examined, see below (the names of the files describe their contents):

hotspot.eclipse.clean.build.log (console messages generated on Clean Hotspot Build action)
hotspot.eclipse.full.build.log (console messages generated on Full Hotspot Build action)
hotspot.eclipse.incremental.build.log (console messages generated on Incremental Hotspot Build action)
gamma.run_or_debug.Usage.output.log (console messages generated on running gamma in verbose mode, and not launching any program)
gamma.run_or_debug.HelloWorld.Verbose.output.log (console messages generated on running gamma in verbose mode, and launching the HelloWorld program)


A number of advanced hacks (assignment for readers!)

1) Insert debug-level log messages into java.c throughout the unit, rebuild gamma and run the Demo class or any other java-based.
2) Refactor java.c and insert debug-level log messages throughout the unit, rebuild gamma and run the Demo class or any other java-based program.
3) After step 2) above, load a low-latency, GC-tuned java based program, with GC-logs enabled and examine the GC-logs produced, to see if there is any change in performance (for performance tuning buffs).
4) Apply the Elvis operator to javac (a good way to get exposure to ‘how to modify javac?’) and compile a java program with the Elvis operator implemented in it.
5) GC-fun: replace the existing garbage collector(s) with a custom one. Resurrect PermGen or iCMS in the existing code. Add your change you always wanted to, to the existing version of Hotspot (for GC buffs).
6) Change javac to be able to parse and compile new language features or understand another dialect of JVM-based languages or maybe even older programming languages like C, Assembly, Scheme or Smalltalk.
7) Replace the built-in class-loader with your custom version.


References

(1) OpenJDK: README for the New Build System
(2) Hotspot Runtime Overview
(3) HotSpot Internals
(4) Hotspot Docs
(5) OpenJDK build instructions (old build)
(6) Hacking Hotspot in Eclipse – Roman Kennke (old build system)
(7) Biased Locking in HotSpot
(8) HotSpot source: command line arguments
(9) Memory leak profiling with netbeans
(10) HotSpot Tools – HotSpot Internals for OpenJDK – Oracle Wiki
(11) HotSpot development on Linux with NetBeans
(12) Building Hotspot in Eclipse under Ubuntu 12.04 (Old Build system)


Related references

Read about the Adopt OpenJDK program at the the Adopt OpenJDK java.net project website. Join the Adopt OpenJDK mailing list at the google group or send an email to adopt-openjdk@googlegroups.com to subscribe to the mailing list. Find out how to join a Google group.
@adoptopenjdk – follow us on twitter, get the latest Adopt OpenJDK community news!

Read about the Adopt-a-JSR program at the java.net project website. Join the Adopt-a-JSR mailing list at the java.net mailing list. Send an email to members@adoptajsr.java.net to subscribe to the mailing list.
@adoptajsr – follow us on twitter, get the latest Adopt-a-JSR community news!


Finally

These instructions will be converted to much compact ‘wiki’ instructions without any of the narrations explanations as mentioned in the blog above – “post any feedback and improvements from the users of the instructions!”. You can post them at the bottom of this blog or tweet them to me at @theNeomatrix369.

‘Thank you’ to those who have helped in the process (@karianna, @RichardWarburto, Girish Balakrishnan, @teozaurus, @SamirTalwar, @sandromancuso and @stPundit). Any (constructive) comments or request for changes are welcome.

I have learnt a lot about the topics covered here i.e. Java, Eclipse and Ubuntu! For those who wish to dive deeper in Hotspot and Java, make use of all the links in the blog, study the bash scripts written to automate the process, above all look into the hotspot folder and take interest in all the files it contains.

Feel free to approach the list of ‘assignment’ hacks, I’ll be more than happy to add links from here to your page if you accomplish any one of them. You will also be mentioned in our community news relayed regularly.

How to build JTReg in Eclipse (for Ubuntu 12.04 LTS)

After taking inspiration from doing a whole lot of work with Eclipse and OpenJDK projects I took off on the journey to experiment with JTReg (http://openjdk.java.net/jtreg/) and attempt to build it in an IDE of my choice i.e. Eclipse. These instructions specify how you can build the JTReg using the Eclipse IDE running under Ubuntu (using OpenJDK’s Old build and Infrabuild systems).

I have kept the structure of this blog similar to the previous one so to maintain uniformity in my approach.

Firstly what is JTReg – it is a regression test harness used by the OpenJDK test framework. The different projects and packages in the OpenJDK system can be individually or wholely tested via JTReg.

Below is a list of systems and versions under which the installations and configurations were performed to come up with these instructions:

Synaptic Package Manager 0.75.9

Eclipse Indigo 3.7.2
—Eclipse JDT (Java) 3.7.2
—Eclipse CDT (C/C++)
——6.0.0.dist (C/C++ Remote debug launcher)
——1.0.2.dist (CDT GCC Cross Compiler)
——7.0.0.dist (GDB Common)

Ubuntu 12.04 LTS
Ant 1.8.4
JavaHelp 2.0
Java Test Harness 4.4
JUnit 4-4.8
OpenJDK 8
Java/Javac 1.7

You need to have an environment with OpenJDK installed and setup (as described in the How to build OpenJDK projects in Eclipse (for Ubuntu 12.04 LTS) – just follow the parts from the start upto the section ‘Preparing projects, folders and files’, as hereafter the ‘meaty OpenJDK shabhang’ starts and we don’t need it for the current work.

If you wish to just download the JTReg binary run tests from the command line, follow the instructions on the
Adopt OpenJDK’s Install JTReg page – configurations for both the Old build and the Infrabuild systems are available there.

At this point you should be able to manually run JTReg tests from the command-line interface (terminal).

Build and run JTReg in Eclipse

Downloading and setting up dependencies

Change the current folder location to the $HOME directory folder and download the JTReg source files from http://hg.openjdk.java.net/code-tools/jtreg using the below command:
Download the JTReg source files from http://hg.openjdk.java.net/code-tools/jtreg using the below command:

 $
 $ hg clone http://hg.openjdk.java.net/code-tools/jtreg
 $ 

this will create a folder by the name jtreg in the current location with the JTReg source files in it.

Alternative but less updated location: http://download.java.net/openjdk/jtreg/). If this route is used, then run the below command in the terminal mode, to download the zip file stored at the above location:

 cd ~
 wget http://www.java.net/download/openjdk/jtreg/promoted/4.1/b04/jtreg-4.1-src-b04_14_mar_2012.zip

Create a folder say under the Home directory ~/ called ‘jtreg’, unzip the zip file into this folder.

JavaHelp
Install Javahelp – required to build jtreg

 sudo apt-get install javahelp2

JavaTest Harness
Download the Javatest Harness 4.4 from http://download.java.net/jtharness/download.html

Run the below commands to download it off the web into ~

 cd ~
 wget http://download.java.net/jtharness/4.4.1/Rel/jtharness-4_4_1-MR1-bin-b13-20_dec_2011.zip

Unzip the zip file into /opt/jtharness/4.4 by doing the below:

 cd /opt
 sudo mkdir jtharness
 sudo mkdir jtharness/4.4
 cd jtharness/4.4
 sudo unzip ~/jtharness-4_4_1-MR1-bin-b13-20_dec_2011.zip

Apache Ant
Download Apache Ant 1.8.4 from http://archive.apache.org/dist/ant/binaries/ using the below commands:

 cd ~
 wget http://archive.apache.org/dist/ant/binaries/apache-ant-1.8.4-bin.zip   

 cd /opt
 sudo unzip ~/apache-ant-1.8.4-bin.zip

JUnit
Download JUnit4 jar file from Maven Central (http://search.maven.org/#search and search for junit4) and copy it into the /opt folder by performing the following commands:

 sudo mkdir /opt/junit4
 sudo mv junit-4.nn.jar /opt/junit4

TestNG
Download TestNG jar file from Maven Central (http://search.maven.org/#search and search for testng) and copy it into the /opt folder by performing the following commands:

 sudo mkdir /opt/testng
 sudo mv testng-n.n.jar /opt/testng

Now make changes to the build.properties file to amend paths for JUnit4, TestNG JavaHelp and JavaTest Harness.

Amending the Ant build properties file

As the build.properties file is protected, you will need to invoke it using the below commands:

 cd ~/jtreg/make
 sudo gedit build.properties

Make the following changes to the build.properties file in the ~/jtreg/make/ folder

jtreg.build.resources=/opt
 jhhome = /usr/share/java
 
 # JTHarness or JavaTest (should be should be 4.3 or better)
 #javatest.home = ${jtreg.build.resources}/jtharness/4.3
 javatest.home = ${jtreg.build.resources}/jtharness/4.4
 
 # JavaHelp (should be version 2.0 or better)
 javahelp.home = ${jhhome}
 #jhall.jar = ${javahelp.home}/javahelp/lib/jhall.jar
 jhall.jar = ${javahelp.home}/jhall.jar
 #jh.jar = ${javahelp.home}/javahelp/lib/jh.jar
 jh.jar = ${javahelp.home}/jh.jar
 
 # JUnit (should be 4.5 or better)
 #junit.jar = ${jtreg.build.resources}/junit/4.5/junit-4.5.jar
 junit.jar = ${jtreg.build.resources}/junit4-n.n.n.jar
  
 # TestNG (should be 6.5 or better)
 #testng.jar = ${jtreg.build.resources}/testng/6.7/other-jars/testng-6.7-dist.jar
 testng.jar = ${jtreg.build.resources}/testng/testng-n.n.jar
 
 # Ant ((should be version 1.6.5 or better)
 #ant.home = ${jtreg.build.resources}/ant/1.7.1
 ant.home = ${jtreg.build.resources}/apache-ant-1.8.4
 ant.jar = ${ant.home}/lib/ant.jar

Ensure comments are placed against the old settings (just in case you need to revert). In order to find the correct location of the jh.jar and jhall.jar files use the ‘find’ command in terminal mode.

Setting up environment variables

Add the below two lines to the ~/.bashrc file (Infrabuild)

     export JT_HOME=$HOME/jtreg                         ............. [1]
     
     or 
     
     export JT_HOME=$HOME/jtreg/dist/jtreg              ..............[2]

[1] Applies if the jtreg binary has been downloaded directly from the JTReg website.
[2] Applies if the jtreg source has been downloaded directly from the JTReg repo and a binary is built locally.

     export PRODUCT_HOME=/home/openjdk/sources/jdk8_tl/build/linux-x64-normal-server-release/images/j2sdk-image

Note: the name of the sub-folder under $SOURCE_CODE/jdk8_tl/build/ folder can have other variants i.e. linux-x86_64-normal-server-release, so please check for this in your build environment before applying the above env settings.

Or the below two lines to the ~/.bashrc file (Old build)

     export PRODUCT_HOME=/home/openjdk/sources/jdk8_tl/build/linux-amd64_backup/j2sdk-image

Now source the .bashrc file using the below command:

source ~/.bashrc

Link folder /jtreg/src to the existing project using the Configure Build Path option.

Add the /opt/apache-ant-1.8.4/lib/ant.jar to the project via the Build Path > Configure Build Path > Libraries option.

Add External JARS…, navigate to the /opt/apache-ant-1.8.4/lib/ folder, select ant.jar and click on Okay.

Importing project via Ant Build file

Run Eclipse.
Select File > New > Other > Java Project from Existing Ant build
Once done select the folder ~/jtreg/make/ and then select the build.xml.

Selecting this file populates all the ant tasks, select the option Link to the buildfile in the file system.

Now select the build.xml file, right mouse click and select the Run As > Ant Build… option, and do the below:
1) Select Main, and add -verbose to the Arguments section
2) Select Targets, and select clean from the list of targets and set the order as clean, build (if you want clean builds each time). Do skim through the list of Ant tasks, to learn the different actions that can be performed pre- and post- builds.
3) Select ClassPath and set the ClassPath for Ant Home to Apach Ant 1.8.4 by selecting Ant Home from the list, and then clicking on the Ant Home button on the bottom right hand corner and select /opt/apache-ant-1.8.4/ from the directory tree.
4) Select JRE, and select java-7-openjdk-amd64 from the list. If it does not exist on the list, click on Installed JREs… and install one by adding a JRE from /usr/lib/jvm/java-7-openjdk-amd64.

Now run the ant script by selecting Run As > Ant build.

See sign of success below (last 30 odd lines of echos from the Ant console)

dist-jtreg:
      [zip] Building zip: /home/openjdk/jtreg/dist/jtreg.zip
      [zip] adding entry jtreg/COPYRIGHT
      [zip] adding entry jtreg/LICENSE
      [zip] adding entry jtreg/README
      [zip] adding entry jtreg/doc/jtreg/faq.html
      [zip] adding entry jtreg/doc/jtreg/tag-spec.txt
      [zip] adding entry jtreg/doc/jtreg/usage.txt
      [zip] adding entry jtreg/legal/jtharness/copyright.txt
      [zip] adding entry jtreg/legal/jtharness/license.txt
      [zip] adding entry jtreg/lib/javatest.jar
      [zip] adding entry jtreg/lib/jh.jar
      [zip] adding entry jtreg/lib/jtreg.jar
      [zip] adding entry jtreg/lib/junit.jar
      [zip] adding entry jtreg/linux/bin/jtdiff
      [zip] adding entry jtreg/linux/bin/jtreg
      [zip] adding entry jtreg/solaris/bin/jtdiff
      [zip] adding entry jtreg/solaris/bin/jtreg
      [zip] adding entry jtreg/win32/bin/jtdiff
      [zip] adding entry jtreg/win32/bin/jtreg
      [zip] Building zip: /home/openjdk/jtreg/dist/jtreg-no-junit.zip
      [zip] adding entry jtreg/COPYRIGHT
      [zip] adding entry jtreg/LICENSE
      [zip] adding entry jtreg/README
      [zip] adding entry jtreg/doc/jtreg/faq.html
      [zip] adding entry jtreg/doc/jtreg/tag-spec.txt
      [zip] adding entry jtreg/doc/jtreg/usage.txt
      [zip] adding entry jtreg/legal/jtharness/copyright.txt
      [zip] adding entry jtreg/legal/jtharness/license.txt
      [zip] adding entry jtreg/lib/javatest.jar
      [zip] adding entry jtreg/lib/jh.jar
      [zip] adding entry jtreg/lib/jtreg.jar
      [zip] adding entry jtreg/linux/bin/jtdiff
      [zip] adding entry jtreg/linux/bin/jtreg
      [zip] adding entry jtreg/solaris/bin/jtdiff
      [zip] adding entry jtreg/solaris/bin/jtreg
      [zip] adding entry jtreg/win32/bin/jtdiff
      [zip] adding entry jtreg/win32/bin/jtreg
build:
BUILD SUCCESSFUL
Total time: 37 seconds

Run Configuration

TODO – able to run OpenJDK tests on one or multiple projects / packages from within Eclipse – anyone dares to go this path?

Newly created Eclipse projects

Now you have a number of ready created Eclipse projects in your Eclipse workspace.

Go to the workspace folder where Eclipse creates the project files and settings i.e. into the /home/openjdk/workspace folder.

There is a folder (called jtreg) representing the project you are currently working in, there are atleast two to four hidden files and folders in this location containing the below:

 .project
 .classpath
 .settings

Importing project via Make file

TODO – importing the JTReg Make file and being able to do the same thing as above – anyone wishes to contribute?

Build and run JTReg from CLI (terminal)

The steps mentioned in sections Downloading and setting up dependencies, Amending the Ant build properties file and Setting up environment variables must be performed before going further.

Once the above settings are in place, build JTReg from the CLI via the following commands

 cd ~/sources/jtreg/make
 ant

This should give the same output as illustrated above under Eclipse section:


 jar-jtreg:
      [jar] Building jar: /home/saiubuntu/sources/jtreg/dist/jtreg/lib/jtreg.jar
 
 -dist-jtreg.doc:
     [copy] Copying 1 file to /home/saiubuntu/sources/jtreg/dist/jtreg/doc/jtreg
 
 -dist-jtreg.bin:
 
 -dist-jtreg.legal:
 
 dist-jtreg:
      [zip] Building zip: /home/saiubuntu/sources/jtreg/dist/jtreg.zip
      [zip] Building zip: /home/saiubuntu/sources/jtreg/dist/open-jtreg.zip
 
 build:
 
 BUILD SUCCESSFUL
 Total time: 9 seconds

Once a build is successful, a number of distribution files are created in the following folders under the jtreg folder structure:

 dist
 ├── jtreg
 │   ├── lib
 │   │   ├── javatest.jar
 │   │   ├── jh.jar
 │   │   ├── jtreg.jar
 │   │   └── junit.jar
 │   ├── linux
 │   │   └── bin
 │   │       ├── jtdiff
 │   │       └── jtreg
 │   ├── solaris
 │   │   └── bin
 │   │       ├── jtdiff
 │   │       └── jtreg
 │   └── win32
 │       └── bin
 │           ├── jtdiff
 │           └── jtreg
 ├── jtreg.zip
 └── open-jtreg.zip

The files under each of the OS names i.e. linux, solaris, windows are bash script files that execute the jtreg.jar file, for e.g.

 ./dist/jtreg/linux/bin/jtreg

or

 java -jar dist/jtreg/lib/jtreg.jar 

the above two will do the exact same thing and expects parameters, see usage screen (only a snapshot of the entire text):

 Documentation Options
                Options for additional documentation
    -h [words...] | -help [words...] | -usage [words...]
                    Command line help. Give words to see help info containing
                    those or use "-help all" to see all available help.
    -n | -relnote   Release notes
    -onlineHelp [words...]
                    Show the online help. You can also show the online help from
                    the desktop Help menu.
    -t | -tagspec   Tag specification supported by this implementation
    -version        Give information about the version of jtreg in use.
 ... [multi-page usage text]

The most simplest syntax to run jtreg is

  [absolute/relative path]/jjtreg [options] [folder]

for example

  [absolute/relative path]/jtreg -verbose:fail [absolute/relative path]/jdk/test/java/lang/invoke/

[absolute/relative path] – applies depending on where you position in the OpenJDK folder structure.

It is also possible to build jtreg via the make command but that would require additional installation of dependent components and configuration. Also have a look at Adopt OpenJDK’s Install JTReg page to see how tests are run via the CLI.

Credit and kudos

My sincere thanks to Jonathan Gibbon’s from OpenJDK’s JTReg team who has been kindly responding to my queries and has walked me through the last important steps in the process!

Thanks to the Adopt OpenJDK initiative led by Martijn Verburg and others – its a pleasure to support our community!

Big thanks to Rabea Gransberger for spending the time and meticulously going through the steps and reporting issues and suggestions.

Come and join us and take on a project (like I did) and make something out of the project and yourself!

Please provide any feedback on areas that work differently for you or does not work for you at all. If you have fixed any issue please let us know so that we can update the information here.

I will continue to refine the instructions above and also include your useful feedback as and when I receive them.

How to build OpenJDK projects in Eclipse (for Ubuntu 12.04 LTS)

The instructions below specify how you can build the following OpenJDK projects using the Eclipse IDE for both the new InfraBuild and the Old Build systems:

Swing
JMX
JConsole
Langtools
JAXP and JAXWS
Hotspot
CORBA
JDK — sub-projects – Old Build
and
JDK — sub-projects – Infrabuild

Below is a list of systems and versions under which the installations and configurations were performed to come up with these instructions:

Synaptic Package Manager 0.75.9

Eclipse Indigo 3.7.2
—Eclipse JDT (Java) 3.7.2
—Eclipse CDT (C/C++)
——6.0.0.dist (C/C++ Remote debug launcher)
——1.0.2.dist (CDT GCC Cross Compiler)
——7.0.0.dist (GDB Common)

Ubuntu 12.04 LTS
Ant 1.8.2
OpenJDK 8
Java/Javac 1.7

In order to start, you have to create a VM (or install in your native environment), get the OpenJDK source code, install a number of packages, and build the OpenJDK from command line, as it described in Adopt OpenJDK VM Build (Old Build and InfraBuild).


Installing Eclipse for Java via the Synaptic Package Manager

Install Synaptic Package Manager using Ubuntu Software Centre

Install Eclipse packages via the Synaptic Package Manager by searching for “Eclipse-jdt” (without quotes).
Select eclipse-jdt from the packages list and the rest of the dependencies will also get selected.

eclipse-jdt

Eclipse Java Development Tool (eclipse-jdt)

Once that is done, click on Apply.
A Summary window will appear, click on the Apply button again.
Then wait till the Downloading Package Files is finished.
Run Eclipse via the Dash Home

DO NOT USE THE “Check for Updates” from the Help menu in Eclipse, this could lead to problems with the Java perspective or render the Eclipse platform unusable (error message). Although you can use the “Install New Software” option from the Help menu – its best not to.

PLEASE USE THE “Synaptic Package Manager” to do any “updates / upgrades” to Eclipse packages and plugins.

You can use the below commands (optional) to update and upgrade packages:

sudo apt-get update
(password requested)

sudo apt-get upgrade

Also accept any available updates from the Ubuntu Software Centre. Once this is done, a reboot of the Ubuntu system will be required.

Run Eclipse

Check if the Java perspective is available (see under File > New > New Project menu options).

JRE Runtime Environment
To add the run-time environment into Eclipse do the following:
a) Go to Windows > Preferences > Java
b) Select Installed JRE
c) Add a JRE by clicking on the Add button
d) Browse to the /usr/lib/jvm/java-7-openjdk-amd64 folder and select it.

Select Installed JRE

Select Installed JRE

e) Click on Finish to add the new JRE to Eclipse’s list of JREs.

InstalledJRE

InstalledJRE for all build.xml scripts

Shutdown Eclipse once done.


Installing Eclipse C/C++ plug-in (Eclipse CDT) via the Synaptic Package Manager

Run the Synaptic Package Manager
Search for “eclipse-cdt” (without quotes) and click on Search

eclipse-cdt

Eclipse C/C++ Development Tool (eclipse-cdt)

A list of packages appear, select ‘eclipse-cdt’ from the list. The a list of dependencies appear, select them all. Select Mark for Installation.
Click on the Apply button on the ribbon panel followed by a click on the Apply button at the bottom right hand corner.

If the Synaptic Package Manager detects updates/upgrades and wishes to perform them, accept and allow the changes to be applied.

Click on Next and finally Finished.

Post Eclipse installations, Eclipse would need to be restarted. Post installation of updates/upgrades Ubuntu would need to be restarted.

Before building any packages through command-line or Eclipse run the below command to install the ‘g++4.6-multlib’ library:

sudo apt-get install g++-4.6-multilib

It ensures that command-line and Eclipse build actions go smoothly wherever the g++ library is needed.

Preparing projects, folders and files

Go to into the ~/sources/jdk8_tl/jdk/make/ folder and copy the netbeans folder and call it eclipse. Similarly go into the ~/sources/jdk8_tl/langtools/make/ folder and copy the netbeans folder and call it eclipse.

Then go to the individual folders and rename the nbproject to ecproject wherever applicable. Remove the contents of this folder.

Open ~/sources/jdk8_tl/jdk/make/eclipse/common/shared.xml in a text editor, go to lines 130 and 132 and replace 1.5 and 1.6 to ${javac.version.source} and ${javac.version.target}. This will eventually be replaced in each of the individual build.properties files for each of the packages as shown below.

Iterate through the below folders to look for the build.xml and build.properties files, if either of them do not exist, create the file:

~/sources/jdk8_tl/jaxp/
~/sources/jdk8_tl/jaxws
~/sources/jdk8_tl/jdk/make/eclipse/j2se/
~/sources/jdk8_tl/jdk/make/eclipse/jconsole/
~/sources/jdk8_tl/jdk/make/eclipse/jmx/
~/sources/jdk8_tl/jdk/make/eclipse/swing/
~/sources/jdk8_tl/langtools/make/eclipse/langtools/

Ensure the build.xml scripts have Ant tasks in each of them.

Otherwise create them taking the build script at ~/sources/jdk8_tl/jdk/make/eclipse/swing/build.xml as an example. For one of the packages the Ant Task does exist but it is surrounded by comments, and would require uncommenting.

Look for the ‘javac’ tag in this file, a typical Ant task looks like the below:

    <target name="run" depends="-init">
        <property name="jvm.args" value=""/>
        <javac srcdir="${swing.demo.src}" destdir="${swing.demo.classes}"
            fork="true" failonerror="true"
            classpath="${dist.dir}/lib/swing.jar:${classes.dir}"
            debug="${javac.debug}" debuglevel="${javac.debuglevel}">
            <compilerarg line="${javac.options}"/>
        </javac>
        <java classname="SampleTree" classpath="${swing.demo.classes}"
            fork="true" failonerror="true"
            jvm="${bootstrap.jdk}/bin/java">
            <jvmarg line="${demo.bootclasspath}"/>
            <arg line="${jvm.args}"/>
        </java>
    </target>

Search and replace all references to the texts “netbeans” and “nbproject” in the above files, to “eclipse” and “ecproject” respectively (without the quotes).

Amend the build.xml scripts to include source files, output and distribution folders (optional).

Also insert the following line at the top of the build.xml file just under the tag for all the above build.xml files:

  <property name="build.properties" location="./build.properties"/>

After importing the above packages, change the JRE version of the build.xml for each of the packages from 1.6 to 1.7 by using the right-mouse-click,

Ant-EditConfiguration (1.6 to 1.7)

Change JRE from 1.6 to 1.7 for all build scripts.

select the menu option Run As > Ant Build…, select the JRE tab, select java-7-openjdk-amd64 from the list next to Separate JRE.

Ant-SelectingAntBuild

Starting the build process by running the Ant Build script.

From within all the build.xml files remove references to the -demo-init, shared-clean, etc… defined with the depends attribute in the tags. Alternatively create dummy ones in each of the script where required in order to validate them sucessfully.

Amend the Ant Task attached to the build.xml by opening the Ant properties page and checking the ‘clean’ task and reording the build and clean taks in the following order, by using the Order button:

clean or shared-clean
build

Now individually import these projects into Eclipse (after ensuring both Java and C/C++ projects can be loaded into Eclipse) after making amendments to the build.properties file for the relevant projects.

NewProject (Import project from Ant Build script)

NewProject (Import project from Ant Build script)

NewJavaProject (next screen)

NewJavaProject (next screen)

SelectBuildXML

Select the build.xml file to import the project.

a) Swing
Before importing any project make the following amendments

Insert the below lines to the ~/sources/jdk8_tl/jdk/make/eclipse/swing/build.properties file:
Old_Build

#PATH to JDK8
bootstrap.jdk=/home/openjdk/sources/jdk8_tl/build/linux-amd64_backup/j2sdk-image
basedir=~/sources/jdk8_tl/jdk/make/eclipse/swing/
javac.version.source=1.5
javac.version.target=1.7

InfraBuild

#PATH to JDK8
bootstrap.jdk=/home/openjdk/sources/jdk8_tl/build/linux-x64-normal-server-release/images/j2sdk-image
basedir=~/sources/jdk8_tl/jdk/make/eclipse/swing/
javac.version.source=1.5
javac.version.target=1.7

If file already exists check if the contents have the above lines, if not add these lines to the bottom of the build.properties file.

Run Eclipse and do the below:

Import a project using the Import a project from existing Ant BuildFile option from New > Project > Other, click on Browse, go to the ~/sources/jdk8_tl/jdk/make/eclipse/swing folder and select build.xml.

Once the build file is loaded, select the ‘Link to buildfile in the file system’ option. The project gets loaded as expected and gets the name defined in the script.

Open the build.xml properties by selecting the file, and selecting the Run As > Build Ant… option from the menu. Set the Target to “shared-clean, build” by selecting shared-clean from the list of targets and changing the order using the Order button.

Run the Build of Swing project by selecting the build.xml file and right mouse click on the Run as > Ant build option.

Observe the messages in the Console tab in Eclipse and wait for sometime till the build is complete (depends on performance of your computer).

See How to build the Swing project for a more detailed approach.

b) JMX
Perform the same step as for Swing using the respective files in the ~/sources/jdk8_tl/jdk/make/eclipse/jmx/ folder. Also amend the build.properties file in the same manner.

Run the Build of JMX project by selecting the build.xml file and right mouse click on the Run as > Ant build option.

Observe the messages in the Console tab in Eclipse and wait for sometime till the build is complete (depends on performance of your computer).

See How to build the JMX project for a more detailed approach.

c) JConsole
Perform the same step as for Swing using the respective files in the ~/sources/jdk8_tl/jdk/make/eclipse/jconsole/ folder.

Amend the build.properties file a bit diferent, insert the below lines instead:

Old Build

#PATH to JDK8
bootstrap.jdk=/home/openjdk/sources/jdk8_tl/build/linux-amd64_backup/j2sdk-image
basedir=~/sources/jdk8_tl/jdk/make/eclipse/jconsole/
javac.version.source=1.7
javac.version.target=1.7

InfraBuild

#PATH to JDK8
bootstrap.jdk=/home/openjdk/sources/jdk8_tl/build/linux-x64-normal-server-release/images/j2sdk-image
basedir=~/sources/jdk8_tl/jdk/make/eclipse/jconsole/
javac.version.source=1.7
javac.version.target=1.7

Run the Build of JConsole project by selecting the build.xml file and right mouse click on the Run as > Ant build option.

Observe the messages in the Console tab in Eclipse and wait for sometime till the build is complete (depends on performance of your computer).

See How to build the JConsole project for a more detailed approach.

d) Langtools

Edit the build.properties for langtools located under ~/sources/jdk8_tl/langtools,and amend the following bits in the boot.java.home section:

boot.java.home = /usr/lib/jvm/java-7-openjdk-amd64
boot.javac.source = 7
boot.javac.target = 7

Copy the build.properties file from the ~/sources/jdk8_tl/langtools/make/ folder to the ~/sources/jdk8_tl/langtools/make/eclipse/langtools folder.

In addition for langtools, change the following two tags at the top of the file from

<project name="langtools-netbeans" default="build" basedir="../../..">
       <property name="langtools.properties" location="make/netbeans/langtools/nbproject/private/langtools.properties"/>

to

<project name="langtools-eclipse" default="build" basedir="../../..">
       <property name="langtools.properties" location="make/eclipse/langtools/ecproject/private/langtools.properties"/>

Ensure the build.properties in the /home/openjdk/sources/jdk8_tl/langtools/make/ folder has the below line in it otherwise add/update it:

boot.java.home = usr/lib/jvm/java-7-openjdk-amd64

Build the project via the right-mouse click Run As > Ant Build option and wait for it to finish.

See How to build the Langtools project for a more detailed approach.

e) JAXP and JAXWS

For both these packages, edit the build.properties for each of them located under ~/sources/jdk8_tl/, add the below line to it:

bootstrap.dir=/usr/lib/jvm/java-7-openjdk-amd64

Perform the same tasks as for the Swing package with these two packages and watch for it to build.

Build the project via the right-mouse click Run As > Ant Build option and wait for it to finish.

See How to build the JAXP and JAXWS projects for a more detailed approach.

f) Hotspot

Building Hotspot via the command-line interface (Old build)

Perform the below instructions to build Hotspot using the old build system (ensure environment variables are set – see the sub-heading Old Build. And the ~/.bashrc file source-ed before proceeding):

source ~/.bashrc

cd ~/sources/jdk8_tl/hotspot/make
make clean
make all
-or-
make clean all

(the first make just does a clean build, the next one does a full or incremental build, whilst the last one always does a clean full build)

A successful build will result in the following build messages that can be found in the log file (https://github.com/neomatrix369/BuildHelpers/blob/master/EclipseProjectsForOpenJDK/Logs/hotspot/hotspotBuild.log). An incremental (another attempt) build results in the following log messages (https://github.com/neomatrix369/BuildHelpers/blob/master/EclipseProjectsForOpenJDK/Logs/hotspot/hotspotBuild2ndPass.log).

Building Hotspot via the command-line interface (InfraBuild)

Configuration
We do not need to set the ALT_BOOTDIR or ALT_JDK_IMPORT_PATH environment variables, instead use the –with-jdk=/usr/lib/jvm/java-7-openjdk-amd64 parameter when calling the configure bashscript, for e.g.

bash ../autoconf/configure –with-boot-jdk=/usr/lib/jvm/java-7-openjdk-amd64/

run the above command from within the ~/sources/jdk8_tl/common/makefiles folder. The jdk or jre path specified with the –with-jdk parameter may vary and is specific to your linux environment.

A successful run results in the output of the following log messages (https://github.com/neomatrix369/BuildHelpers/blob/master/EclipseProjectsForOpenJDK/Logs/configureInfraBuild.log).

Building
Perform the below instructions to build Hotspot using the Infrabuild system (ensure the necessary enviroment variables are set and the ALT_… environment variables are unset – see the sub-heading InfraBuild. And the ~/.bashrc file source-ed before proceeding)

source ~/.bashrc
make clean hotspot NEW_BUILD=true &> hotspotInfraBuild.log

A successful run results in the output of the following log messages (https://github.com/neomatrix369/BuildHelpers/blob/master/EclipseProjectsForOpenJDK/Logs/hotspot/hotspotInfraBuild.log). An incremental (another attempt) build results in the following log messages (https://github.com/neomatrix369/BuildHelpers/blob/master/EclipseProjectsForOpenJDK/Logs/hotspot/hotspotInfraBuild2ndPass.log).

Perform the configuration settings in Eclipse for Hotspot using the instructions at Eclipse C/C++ (CDT) – Hacking Hotspot in Eclipse and the Adding include paths to your C/C++ project instructions sets.

Ensure the below environment variables are added to the project:
Old Build

LANG=C
ALT_BOOTDIR=/usr/lib/jvm/java-7-openjdk-amd64
ALT_JDK_IMPORT_PATH=/usr/lib/jvm/java-7-openjdk-amd64
PRODUCT_HOME=/home/openjdk/sources/jdk8_tl/build/linux-amd64_backup/j2sdk-image
ZIP_DEBUGINFO_FILES=0

InfraBuild

LANG=C
PRODUCT_HOME=/home/openjdk/sources/jdk8_tl/build/linux-x64-normal-server-release/images/j2sdk-image
ZIP_DEBUGINFO_FILES=0
ARCH_DATA_MODEL=64

Special steps for creating the C/C++ projects
Add the ‘make’ folder to the Source folder list by going to Project Properties > C/C++ General / Paths and Symbols > Source Location.
Click on Add Folder and select the /hotspot/make folder.

Then add an external builder by going to Project Properties > Builders
Click on New, choose Program as configuration type, click on OK and
call the builder ‘make_hotspot’.
Link it to /usr/bin/make by setting as the Location
Make the Working directory point to the make or makefiles folder – use the Browse Filesystem option to locate it.

For you’d like to do incremental builds, add “all” to the arguments list and for a full build add “clean” and “all” in order to determine the build action each time the project is built:
clean
all

Finally add the above enlisted environment variables for Hotspot to the External Builder configuration under the Environment tab, as shown in the screen-shot (enlists two of the remaining expected environment variables):

External Builder Environment Settings

External Builder Environment Settings

Now under Project Properties > C/C++ build
Under the Builder Settings tab
Check Generate Makefiles Automatically
Select External Builder as the Builder type (see at the top of the tab)
Keep the Generate Makefiles automatically checked.
Click on Apply.

Now Go to the Behaviour tab and uncheck the options [Build on resource save…] and [Build(incremental build)] options to ensure that the External builder configuration is used when the build action is invoked on a project.

Click on OK.

Build the project via the Project > Build Project option and wait for it to finish. At this point the project should be in a state to be build by either the Internal or the External Builder.

See How to build the Hotspot project for a more detailed approach.

g) Corba

Do the same actions as above for Corba as for the Hotspot project and translate names and locations that relate to the Corba project.

Build the project via the Project > Build Project option and wait for it to finish. At this point the project should be in a state to be build by either the Internal or the External Builder.

See How to build the Corba project for a more detailed approach.

h) JDK — sub-projects – Old Build

This build depends on successful builds of the Hotspot, JAX, JAXWS, Langtools and Corba packages.

Add the below lines to the build.properties file in case it does not already exist:

make.options=\
ALT_BOOTDIR=/usr/lib/jvm/java-7-openjdk-amd64 \
ALT_LANGTOOLS_DIST=~/sources/jdk8_tl/langtools/dist \
ALT_CORBA_DIST=~/sources/jdk8_tl/corba/dist \
ALT_JAXP_DIST=~/sources/jdk8_tl/jaxp/dist \
ALT_JAXWS_DIST=~/sources/jdk8_tl/jaxws/dist \
HOTSPOT_IMPORT_PATH=~/sources/jdk8_tl/hotspot/build/linux-amd64_backup/hotspot/import \
ALT_HOTSPOT_IMPORT_PATH=~/sources/jdk8_tl/hotspot/build/linux-amd64_backup/hotspot/import \
HOTSPOT_SERVER_PATH=~/sources/jdk8_tl/build/linux-amd64_backup/hotspot/import/jre/lib/amd64/server \
ALT_HOTSPOT_SERVER_PATH=~/sources/jdk8_tl/build/linux-amd64_backup/hotspot/import/jre/lib/amd64/server \
OPENJDK=true

Import a project using the Import a project from existing Ant BuildFile option via the New > Project > Other menu option and select ~/sources/jdk8_tl/jdk/make/eclipse/j2se/build.xml file for the j2se project.

Alternatively the whole project can be loaded as a C/C++ project following the same instructions as for the Hotspot project above. The above environment variables settings will be required to be added to the project.

Build the project via the Project > Build Project option and wait for it to finish.

Once all of these packages are build successfully, close down Eclipse.

For sanity check purposes please ensure that the individual packages / projects build from the command prompt and the OpenJDK project as a whole builds from the command prompt i.e.

cd ~/sources/jdk8_tl/[...project..]/make/    or   cd ~/sources/jdk8_tl/jdk/make/[...project..]/
make all

This is to ensure one process hasn’t negatively impacted the other. For a list of project names refer to the section at the top of page.

See How to build the JDK sub-projects – Old build for a more detailed approach.

i) JDK — sub-projects – Infrabuild

Do the same actions as above for the Hotspot project and translate names and locations that relate to the OpenJDK project. Import the project from /home/openjdk/sources/jdk8_tl/common/makefiles folder, rename the project to something like ‘OpenJDK’ instead of the ‘makefiles’ name given by default. Depending on the build system used, apply the below environment variable and argument list settings (does not require the traditional ALT_ ones anymore – instead they should all be unset).

LANG=C
PRODUCT_HOME=/home/openjdk/sources/jdk8_tl/build/linux-x64-normal-server-release/images/j2sdk-image
ZIP_DEBUGINFO_FILES=0

When setting up the External Builder setting for the Infrabuild system, you can apply one of the below entries in the arguments list:

images
clean images
images VERBOSE=”-d -p”
clean images VERBOSE=”-d -p”

Note: Please refer to http://openjdk.java.net/projects/build-infra/guide.html for further details on what the arguments mean in the Infrabuild system.

The rest of the instructions to setup the Hotspot project apply. Build the project via the Project > Build Project option and wait for it to finish. The above results in creation of the j2re and j2sdk images in the /jdk8_tl/build/linux-x64-normal-server-release/images folder (in folders j2re-image and j2sdk-image respectively).

Note: you can jump start the process by using the ready-made projects made available in the Github repo mentioned below. A clean build using the InfraBuild system would take an hour on a VM and under 15 minutes on a native machine – all this subject to various performance factors of a system. The Old build system is slower in this respect.

See How to build the JDK sub-projects – Infrabuild for a more detailed approach.


Full OpenJDK build Logs

See Full OpenJDK build Logs to view the logs produced from a full build action.


Full OpenJDK build output

See Full build output: artefacts for details on build outputs (artefacts) produced from a full build action.


Newly created Eclipse projects

Now you have a number of ready created Eclipse projects in your Eclipse workspace.

Go to the workspace folder where Eclipse creates the project files and settings i.e. into the /home/openjdk/workspace folder.

There are a number of folders each representing the project you have been working on, in each folder there are atleast two to four hidden files and folders such as:

.project
.cproject
.classpath
.settings

Copy these over to the folders for each of the respective packages under the ecproject folder in the respective folders as shown below.

~/sources/jdk8_tl/jaxp/ecproject/
~/sources/jdk8_tl/jaxws/ecproject/
~/sources/jdk8_tl/jdk/make/eclipse/j2se/ecproject/
~/sources/jdk8_tl/jdk/make/eclipse/jconsole/ecproject/
~/sources/jdk8_tl/jdk/make/eclipse/jmx/ecproject/
~/sources/jdk8_tl/jdk/make/eclipse/swing/ecproject/
~/sources/jdk8_tl/langtools/make/eclipse/langtools/ecproject/

An archive of the list of files that were modified across the openJDK system can be found at (include .cproject, .project, build.xml, build.properties, etc… files):

Github repo with directory structure of files and folders (last updated 18/09/2012) for both the Old Build and the InfraBuild system

In the Infrabuild folder in the repo, two new projects namely openJDK (images) and openJDK (images VERBOSE) have been included to build the whole OpenJDK system via the InfraBuild system.

Here is a list of packages which were not built during the process, they all have the necessary make and build scripts in them:

awt2d
jarzip
jdwpgen
world

Please provide any feedback on areas that work differently for you. If you have fixed an issue also let us know so that we can update the information here.

This blog has been inspired by a couple of JUG members working on the OpenJDK project, below are links leading upto them. Their instructions and systemic approach have helped in the process:

Netbeans projects for OpenJDK – Martijn Verburg
Netbeans projects for OpenJDK – Andrii Rodionov
Hacking Hotspot in Eclipse – Roman Kennke
Adding include paths to your C/C++ project – Roland
Sachin Handiekar – Screen-shots and other improvements.
Girish Balakrishnan – for reviewing and feedback on the Hotspot instructions.
Jonathan Gibbons (from the OpenJDK team) – Thanks for reviewing the Langtools section.

A number of other online resources and videos have also helped in the process.