After looking at a lot of Java/JVM based NLP libraries listed on Awesome AI/ML/DL I decided to pick the Apache OpenNLP library. One of the reasons comes from the fact another developer (who had a look at it previously) recommended it. Besides, it’s an Apache project, they have been great supporters of F/OSS Java projects for the last two decades or so (see Wikipedia). It also goes without saying that Apache OpenNLP is backed by the Apache 2.0 license, read more…
We are all aware of Machine Learning tools and cloud services that work via the browser and give us an interface we can use to perform our day-to-day data analysis, model training, and evaluation, and other tasks to various degrees of efficiencies….
On the back of my previous share on how to build and run a docker container with Jupyter, I’ll be taking this further on how we can make this run on a cloud platform. We’ll try to do this on Oracle Cloud Infrastructure (OCI). In theory, we should be able to do everything in the blog on any VM or Baremetal instance. If you are new to Oracle Cloud, I would suggest getting familiar with the docs and Getting Started sections of the docs. You will also find several informative links at the bottom of this post, in the Resources section…
Some time ago I came across this life-cycle management tool (or cloud service) called Valohai and I was quite impressed by its user-interface and simplicity of design and layout. I had a good chat about the service at that time with one of the…
Citation: feature image on the blog can be found on flickr and created by Luca Galli. The image in one of the below sections can be also found on flickr and created by fklv (Obsolete hipster).
The GraalVM compiler is a replacement to HotSpot’s server-side JIT compiler widely known as the C2 compiler. It is written in Java with the goal of better performance (among other goals) as compared to the C2 compiler. New changes starting with Java 9 mean that we can now plug in our own hand-written C2 compiler into the JVM, thanks to JVMCI. The researchers and engineers at Oracle Labs) have created a variant of JDK8 with JVMCI enabled which can be used to build the GraalVM compiler. The GraalVM compiler is open source and is available on GitHub (along with the HotSpot JVMCI sources) needed to build the GraalVM compiler). This gives us the ability to fork/clone it and build our own version of the GraalVM compiler.
In this post, we are going to build the GraalVM compiler with JDK8 on CircleCI. The resulting artifacts are going to be:
– JDK8 embedded with the GraalVM compiler, and – a zip archive containing Graal & Truffle modules/components.
Note: we are not covering how to build the whole of the GraalVM suite in this post, that can be done via another post. Although these scripts can be used to that, and there exists abranch which contains the rest of the steps.
Why use a CI tool to build the GraalVM compiler?
Continuous integration (CI) and continuous deployment (CD) tools have many benefits. One of the greatest is the ability to check the health of the code-base. Seeing why your builds are failing provides you with an opportunity to make a fix faster. For this project, it is important that we are able to verify and validate the scripts required to build the GraalVM compiler for Linux and macOS, both locally and in a Docker container.
A CI/CD tool lets us add automated tests to ensure that we get the desired outcome from our scripts when every PR is merged. In addition to ensuring that our new code does not introduce a breaking change, another great feature of CI/CD tools is that we can automate the creation of binaries and the automatic deployment of those binaries, making them available for open source distribution.
Let’s get started
During the process of researching CircleCI as a CI/CD solution to build the GraalVM compiler, I learned that we could run builds via two different approaches, namely:
– A CircleCI build with a standard Docker container (longer build time, longer config script)
– A CircleCI build with a pre-built, optimised Docker container (shorter build time, shorter config script)
We will now go through the two approaches mentioned above and see the pros and cons of both of them.
Approach 1: using a standard Docker container
For this approach, CircleCI requires a docker image that is available in Docker Hub or another public/private registry it has access to. We will have to install the necessary dependencies in this available environment in order for a successful build. We expect the build to run longer the first time and, depending on the levels of caching, it will speed up.
To understand how this is done, we will be going through the CircleCI configuration file section-by-section (stored in .circleci/circle.yml), see config.yml in .circleci for the full listing, see commit df28ee7 for the source changes.
Explaining sections of the config file
The below lines in the configuration file will ensure that our installed applications are cached (referring to the two specific directories) so that we don’t have to reinstall the dependencies each time a build occurs:
We will be referring to the docker image by its full name (as available on http://hub.docker.com under the account name used – adoptopenjdk). In this case, it is a standard docker image containing JDK8 made available by the good folks behind the Adopt OpenJDK build farm. In theory, we can use any image as long as it supports the build process. It will act as the base layer on which we will install the necessary dependencies:
Next, in the pre-Install Os dependencies step, we will restore the cache, if it already exists, this may look a bit odd, but for unique key labels, the below implementation is recommended by the docs):
Then, in the Install Os dependencies step we run the respective shell script to install the dependencies needed. We have set this step to timeout if the operation takes longer than 2 minutes to complete (see docs for timeout):
          - run:
              name: Install Os dependencies
              command: ./build/x86_64/linux_macos/osDependencies.sh
              timeout: 2m
Then, in then post-Install Os dependencies step, we save the results of the previous step – the layer from the above run step (the key name is formatted to ensure uniqueness, and the specific paths to save are included):
Then, in the Build and install make via script step we run the shell script to install a specific version of make and it is set to timeout if step takes longer than 1 minute to finish:
          - run:
              name: Build and install make via script
              command: ./build/x86_64/linux_macos/installMake.sh
              timeout: 1m
Then, in the post Build and install make via script step, we save the results of the above action to the cache:
Then, we define environment variables to update JAVA_HOME and PATH at runtime. Here the environment variables are sourced so that we remember them for the next subsequent steps till the end of the build process (please keep this in mind):
          - run:
              name: Define Environment Variables and update JAVA_HOME and PATH at Runtime
              command: |
                echo '....'     <== a number of echo-es displaying env variable values
                source ${BASH_ENV}
Then, in the step to Display Hardware, Software, Runtime environment and dependency versions, as best practice we display environment-specific information and record it into the logs for posterity (also useful during debugging when things go wrong):
          - run:
              name: Display HW, SW, Runtime env. info and versions of dependencies
              command: ./build/x86_64/linux_macos/lib/displayDependencyVersion.sh
Then, we run the step to setup MX – this is important from the point of view of the GraalVM compiler (mx) is a specialised build system created to facilitate compiling and building Graal/GraalVM and components):
Then, we run the important step to Build JDK JVMCI (we build the JDK with JVMCI enabled here) and timeout, if the process takes longer than 15 minutes without any output or if the process takes longer than 20 minutes in total to finish:
Then, we run the step Setting up environment and Build GraalVM Compiler, to set up the build environment with the necessary environment variables which will be used by the steps to follow:
Then, we run the step Build the GraalVM Compiler and embed it into the JDK (JDK8 with JVMCI enabled) which timeouts if the process takes longer than 7 minutes without any output or longer than 10 minutes in total to finish:
          - run:
              name: Build the GraalVM Compiler and embed it into the JDK (JDK8 with JVMCI enabled)
              command: |
                echo ">>>> Using JDK8_JVMCI_HOME as JAVA_HOME (${JAVA_HOME})"
                ./build/x86_64/linux_macos/lib/buildGraalCompiler.sh ${BASEDIR} ${MX} ${BUILD_ARTIFACTS_DIR}
              timeout: 10m
              no_output_timeout: 7m
Then, we run the simple sanity checks to verify the validity of the artifacts created once a build has been completed, just before archiving the artifacts:
Then, we run the step Archiving artifacts (means compressing and copying final artifacts into a separate folder) which timeouts if the process takes longer than 2 minutes without any output or longer than 3 minutes in total to finish:
Finally, we store the generated artifacts at a specified location – the below lines will make the location available on the CircleCI interface (we can download the artifacts from here):
          - store_artifacts:
              name: Uploading artifacts in jdk8-with-graal-local
              path: jdk8-with-graal-local/
Approach 2: using a pre-built optimised Docker container
For approach 2, we will be using a pre-built docker container, that has been created and built locally with all necessary dependencies, the docker image saved and then pushed to a remote registry for e.g. Docker Hub. And then we will be referencing this docker image in the CircleCI environment, via the configuration file. This saves us time and effort for running all the commands to install the necessary dependencies to create the necessary environment for this approach (see the details steps in Approach 1 section).
We expect the build to run for a shorter time as compared to the previous build and this speedup is a result of the pre-built docker image (we will see in the Steps to build the pre-built docker image section), to see how this is done). The additional speed benefit comes from the fact that CircleCI caches the docker image layers which in turn results in a quicker startup of the build environment.
We will be going through the CircleCI configuration file section-by-section (stored in .circleci/circle.yml) for this approach, see config.yml in .circleci for the full listing, see commit e5916f1 for the source changes.
Explaining sections of the config file
Here again, we will be referring to the docker image by it’s full name. It is a pre-built docker image neomatrix369/graalvm-suite-jdk8 made available by neomatrix369. It was built and uploaded to Docker Hub in advance before the CircleCI build was started. It contains the necessary dependencies for the GraalVM compiler to be built:
In the following section, I will go through the steps show how to build the pre-built docker image. It will involve running the bash scripts – ./build/x86_64/linux_macos/osDependencies.sh and ./build/x86_64/linux_macos/installMake.sh to install the necessary dependencies as part of building a docker image. And, finally pushing the image to Docker Hub (can be pushed to any other remote registry of your choice).
Steps to build the pre-built docker image
– Run build-docker-image.sh (see bash script source) which depends on the presence of Dockerfile (see docker script source). The Dockerfile does all the necessary tasks of running the dependencies inside the container i.e. runs the bash scripts ./build/x86_64/linux_macos/osDependencies.sh and ./build/x86_64/linux_macos/installMake.sh:
$ ./build-docker-image.sh
– Once the image has been built successfully, run push-graal-docker-image-to-hub.sh after setting the USER_NAME and IMAGE_NAME (see source code) otherwise it will use the default values as set in the bash script:
Some speedup due to caching, but slower than Approach 2
Speed-up due to pre-built docker image, and also due to caching at different steps. Faster than Approach 1
Ensure DLC layering is enabled (its a paid feature)
What not to do?
Approach 1 issues
I came across things that wouldn’t work initially, but were later fixed with changes to the configuration file or the scripts:
please make sure the .circleci/config.yml is always in the root directory of the folder
when using the store_artifacts directive in the .circleci/config.yml file setting, set the value to a fixed folder name i.e. jdk8-with-graal-local/ – in our case, setting the path to ${BASEDIR}/project/jdk8-with-graal didn’t create the resulting artifact once the build was finished hence the fixed path name suggestion.
environment variables: when working with environment variables, keep in mind that each command runs in its own shell hence the values set to environment variables inside the shell execution environment isn’t visible outside, follow the method used in the context of this post. Set the environment variables such that all the commands can see its required value to avoid misbehaviours or unexpected results at the end of each step.
caching: use the caching functionality after reading about it, for more details on CircleCI caching refer to the caching docs. See how it has been implemented in the context of this post. This will help avoid confusions and also help make better use of the functionality provided by CircleCI.
Approach 2 issues
Caching: check the docs when trying to use the Docker Layer Caching (DLC) option as it is a paid feature, once this is known the doubts about “why CircleCI keeps downloading all the layers during each build” will be clarified, for Docker Layer Caching details refer to docs. It can also clarify why in non-paid mode my build is still not as fast as I would like it to be.
General note:
Light-weight instances: to avoid the pitfall of thinking we can run heavy-duty builds, check the documentation on the technical specifications of the instances. If we run the standard Linux commands to probe the technical specifications of the instance we may be misled by thinking that they are high specification machines. See the step that enlists the Hardware and Software details of the instance (see Display HW, SW, Runtime env. info and versions of dependencies section). The instances are actually Virtual Machines or Container like environments with resources like 2CPU/4096MB. This means we can’t run long-running or heavy-duty builds like building the GraalVM suite. Maybe there is another way to handle these kinds of builds, or maybe such builds need to be decomposed into smaller parts.
Global environment variables: as each run line in the config.yml, runs in its own shell context, from within that context environment variables set by other executing contexts do not have access to these values. Hence in order to overcome this, we have adopted two methods:
pass as variables as parameters to calling bash/shell scripts to ensure scripts are able to access the values in the environment variables
use the source command as a run step to make environment variables accessible globally
End result and summary
We see the below screen (the last step i.e. Updating artifacts enlists where the artifacts have been copied), after a build has been successfully finished:
The artifacts are now placed in the right folder for download. We are mainly concerned about the jdk8-with-graal.tar.gz artifact.
Performance
Before writing this post, I ran multiple passes of both the approaches and jotted down the time taken to finish the builds, which can be seen below:
– Approach 1: standard CircleCI build (caching enabled)
– 13 mins 28 secs
– 13 mins 59 secs
– 14 mins 52 secs
– 10 mins 38 secs
– 10 mins 26 secs
– 10 mins 23 secs
– Approach 2: using pre-built docker image (caching enabled, DLC) feature unavailable)
– 13 mins 15 secs
– 15 mins 16 secs
– 15 mins 29 secs
– 15 mins 58 secs
– 10 mins 20 secs
– 9 mins 49 secs
Note: Approach 2 should show better performance when using a paid tier, as Docker Layer Caching) is available as part of this plan.
Sanity check
In order to be sure that by using both the above approaches we have actually built a valid JDK embedded with the GraalVM compiler, we perform the following steps with the created artifact:
– Firstly, download the jdk8-with-graal.tar.gz artifact from under the Artifacts tab on the CircleCI dashboard (needs sign-in):
– Then, unzip the .tar.gz file and do the following:
tar xvf jdk8-with-graal.tar.gz
– Thereafter, run the below command to check the JDK binary is valid:
With this, we have successfully built JDK8 with the GraalVM compiler embedded in it and also bundled the Graal and Truffle components in an archive file, both of which are available for download via the CircleCI interface.
Note: you will notice that we do perform sanity checks of the binaries built just before we pack them into compressed archives, as part of the build steps (see bottom section of CircleCI the configuration files section).
Nice badges!
We all like to show-off and also like to know the current status of our build jobs. A green-colour, build status icon is a nice indication of success, which looks like the below on a markdown README page:
We can very easily embed both of these status badges displaying the build status of our project (branch-specific i.e. master or another branch you have created) built on CircleCI (see docs) on how to do that).
Conclusions
We explored two approaches to build the GraalVM compiler using the CircleCI environment. They were good experiments to compare performance between the two approaches and also how we can do them with ease. We also saw a number of things to avoid or not to do and also saw how useful some of the CircleCI features are. The documentation and forums do good justice when trying to make a build work or if you get stuck with something.
Once we know the CircleCI environment, it’s pretty easy to use and always gives us the exact same response (consistent behaviour) every time we run it. Its ephemeral nature means we are guaranteed a clean environment before each run and a clean up after it finishes. We can also set up checks on build time for every step of the build, and abort a build if the time taken to finish a step surpasses the threshold time-period.
The ability to use pre-built docker images coupled with Docker Layer Caching on CircleCI can be a major performance boost (saves us build time needed to reinstall any necessary dependencies at every build). Additional performance speedups are available on CircleCI, with caching of the build steps – this again saves build time by not having to re-run the same steps if they haven’t changed.
There are a lot of useful features available on CircleCI with plenty of documentation and everyone on the community forum are helpful and questions are answered pretty much instantly.
Next, let’s build the same and more on another build environment/build farm – hint, hint, are you think the same as me? Adopt OpenJDK build farm)? We can give it a try!
Please do let me know if this is helpful by dropping a line in the comments below or by tweeting at @theNeomatrix369, and I would also welcome feedback, see how you can reach me, above all please check out the links mentioned above.
*notes is for notebooks in Zeppelin lingo Introduction Continuing from the previous post, Two years in the life of AI, ML, DL and Java, where I had expressed my motivation. I mentioned about our discussions, one of the discussions was, that you can write in languages like Python, R, Julia in JuPyteR notebooks.…
Two years in the life of AI, ML, DL and Java Citation All the images in the post are owned by the respective owners / creators / authors. Introduction AI, ML and DL are acronyms for Artificial Intelligence, Machine Learning and Deep Learning. Now back to what I was going to write about. If you…
2014 – We must adopt #microservices to solve all problems with monoliths2016 – We must adopt #docker to solve all problems with microservices2018 – We must adopt #kubernetes to solve all problems with docker pic.twitter.com/CrnvX9Lgpq — Syed Aqueel Haider (@sahrizv) July 14, 2018 Even though Docker was a 2016 thing, it is still relevant today.…
About a couple of months ago, I got introduced to Google Colab (an enhanced version of JuPyteR notebooks) and since then didn’t look back. It’s got everything and more you need as a researcher. The initial idea was to load up python notebooks and run them on it. Soon we realised we can actually run those notebooks not just on CPUs available on GCP but also GPUs and TPUs. Also, read up a bit about it from other sources, see Google Reveals Technical Specs and Business Rationale for TPU Processor (slightly dated, but definitely helpful).
Here we go now…
What is a TPU?
Just like a GPU is a graphics accelerator ASIC (to help create graphics images quickly for output to a display device) – which since long have been discovered that can be taken advantage of by using it for massive number crunching. Similarly, a TPU is an AI accelerator ASIC developed by Google specifically for Neural NetworkMachine Learning. One of the differences being TPUs are more about processing high-volume low-precision computation while GPUs for high-volume high-precision computation (please check the Wikipedia links for the interesting differences).
Then what?
TL;DR — how the notebooks and slides came about
To understand how these devices work, what better approach can we adopt than to benchmark them and then compare the results. Which is why we had a number of notebooks that came out of these experiments. And then we were also coincidentally preparing for Google Cloud Next 2018 at the Excel Center, London. And I spent an evening and a weekend preparing the slides for the talk Yaz and I were asked to give – Harnessing the Powers of Cloud TPU.
What happened first, before the other thing happened?
TL;DR — how we work at the GDG Cloud meetup events
It was a mere coincidence while we were meeting regularly at the GDG Cloud meetups in the London chapter, where Yaz would find interesting things to look at during the hack sessions (Pomodoro sessions – as he called them), suggested one session that we play with TPUs and benchmark them. Actually, I remember suggesting we do this during our sessions as an idea, but then we all got distracted with other equally interesting ideas (all saved somewhere on GitLab). And then I frantically started playing with two notebooks related to GPU and TPU respectively, provided as examples by Colab, which I then got to work on the TPU and then adapted it to work on the GPU (can’t remember anymore which way first). They both were doing slightly different things and measuring the performance of the GPU and TPU and I decided to make them do the same thing and measure the time taken to do it on the different device. Also, display details about the devices themselves (you will see towards the top or bottom of each notebook).
CPU v/s GPU v/s TPU – Simple benchmarking example via Google Colab
TFLOP is a bit of shorthand for “teraflop”, which is a way of
measuring the power of a computer based more on mathematical
capability than GHz. A teraflop refers to the capability of a
processor to calculate one trillion floating-point operations
per second.
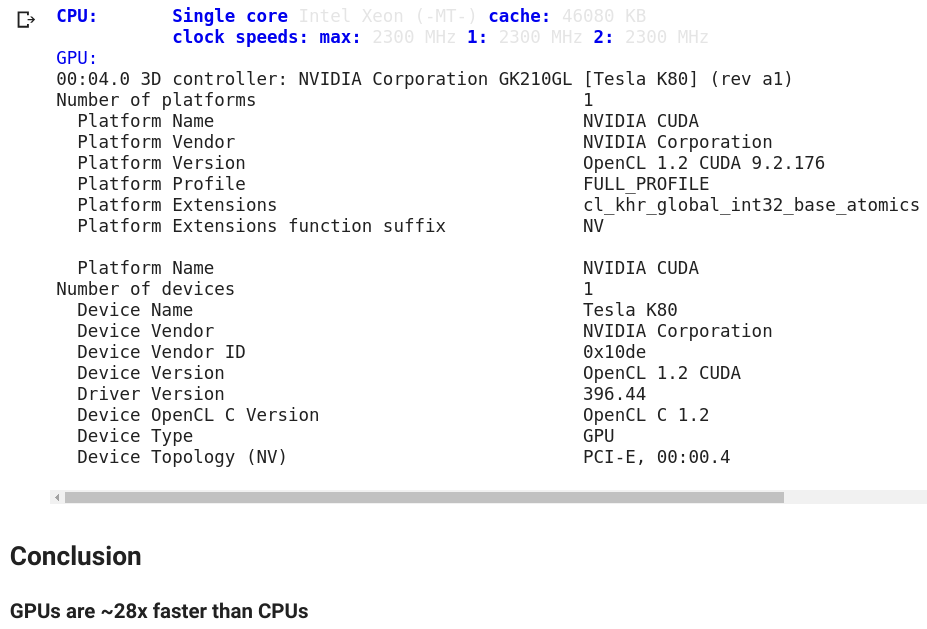
CPU TFlops: 0.53
GPU speedup over CPU: 29x TFlops: 15.70
I was curious about the internals of the CPU and GPU so I ran some Linux commands (via Bash) that the notebooks allow (thankfully) and got these bits of info to share:
You can find all those commands and the above output in the notebook as well.
TFLOP is a bit of shorthand for “teraflop” which is a way of
measuring the power of a computer based more on mathematical
capability than GHz. A teraflop refers to the capability of a
processor to calculate one trillion floating-point operations
per second.

CPU TFlops: 0.47
TPU speedup over CPU (cold-start): 75x        TFlops: 35.47
TPU speedup over CPU (after warm-up): 338x    TFlops: 158.91
Unfortunately, I haven’t had a chance to play around with the TPU profiler yet to learn more about the internals of this fantastic device.
While there is room for errors and inaccuracies in the above figures, you might be curious about the tasks used for all the runs – it’s the below piece of code that has been making the CPU, GPU and TPU circuitry for the Simple benchmarking notebooks:
def cpu_flops():
  x = tf.random_uniform([N, N])
  y = tf.random_uniform([N, N])
  def _matmul(x, y):
    return tf.tensordot(x, y, axes=[[1], [0]]), y

  return tf.reduce_sum(
    tf.contrib.tpu.repeat(COUNT, _matmul, [x, y])
  )
CPU v/s GPU v/s TPU – Time-series prediction via Google Colab
Running the TPU version of the Timeseries notebook gave us some issues initially, which was reported on a StackOverflow post and a couple of good folks from the Google Cloud TPU team stepped in to help. But we managed to get the GPU version of the Time-Series Prediction notebook to work which clearly showed a much better response than the CPU version of Time-Series Prediction notebook – this version just choked half-way through the CPU-cycles and Colab asked me if I wanted to stop the process because we needed more resources (more memory)!!!
Time series: GPU version
Here snapshots of the notebook (Train the Recurrent Neural Network section), the full notebook can be found on Google Colab, it’s free to download, share and extract the python code in it.
Epoch 1/10
9/10 [==========================>...] - ETA: 4s - loss: 0.0047WARNING:tensorflow:Early stopping conditioned on metric `val_loss` which is not available. Available metrics are: loss
WARNING:tensorflow:Can save best model only with val_loss available, skipping.
WARNING:tensorflow:Reduce LR on plateau conditioned on metric `val_loss` which is not available. Available metrics are: loss,lr
10/10 [==============================] - 42s 4s/step - loss: 0.0048
Epoch 2/10
9/10 [==========================>...] - ETA: 4s - loss: 0.0041WARNING:tensorflow:Early stopping conditioned on metric `val_loss` which is not available. Available metrics are: loss
WARNING:tensorflow:Can save best model only with val_loss available, skipping.
WARNING:tensorflow:Reduce LR on plateau conditioned on metric `val_loss` which is not available. Available metrics are: loss,lr
10/10 [==============================] - 42s 4s/step - loss: 0.0041
Epoch 3/10
9/10 [==========================>...] - ETA: 4s - loss: 0.0047WARNING:tensorflow:Early stopping conditioned on metric `val_loss` which is not available. Available metrics are: loss
WARNING:tensorflow:Can save best model only with val_loss available, skipping.
WARNING:tensorflow:Reduce LR on plateau conditioned on metric `val_loss` which is not available. Available metrics are: loss,lr
10/10 [==============================] - 42s 4s/step - loss: 0.0046
Epoch 4/10
9/10 [==========================>...] - ETA: 4s - loss: 0.0039WARNING:tensorflow:Early stopping conditioned on metric `val_loss` which is not available. Available metrics are: loss
WARNING:tensorflow:Can save best model only with val_loss available, skipping.
WARNING:tensorflow:Reduce LR on plateau conditioned on metric `val_loss` which is not available. Available metrics are: loss,lr
10/10 [==============================] - 43s 4s/step - loss: 0.0039
Epoch 5/10
9/10 [==========================>...] - ETA: 4s - loss: 0.0048WARNING:tensorflow:Early stopping conditioned on metric `val_loss` which is not available. Available metrics are: loss
WARNING:tensorflow:Can save best model only with val_loss available, skipping.
WARNING:tensorflow:Reduce LR on plateau conditioned on metric `val_loss` which is not available. Available metrics are: loss,lr
10/10 [==============================] - 44s 4s/step - loss: 0.0048
Epoch 6/10
9/10 [==========================>...] - ETA: 4s - loss: 0.0036WARNING:tensorflow:Early stopping conditioned on metric `val_loss` which is not available. Available metrics are: loss
WARNING:tensorflow:Can save best model only with val_loss available, skipping.
WARNING:tensorflow:Reduce LR on plateau conditioned on metric `val_loss` which is not available. Available metrics are: loss,lr
10/10 [==============================] - 44s 4s/step - loss: 0.0037
Epoch 7/10
9/10 [==========================>...] - ETA: 4s - loss: 0.0042WARNING:tensorflow:Early stopping conditioned on metric `val_loss` which is not available. Available metrics are: loss
WARNING:tensorflow:Can save best model only with val_loss available, skipping.
WARNING:tensorflow:Reduce LR on plateau conditioned on metric `val_loss` which is not available. Available metrics are: loss,lr
10/10 [==============================] - 44s 4s/step - loss: 0.0041
Epoch 8/10
9/10 [==========================>...] - ETA: 4s - loss: 0.0037WARNING:tensorflow:Early stopping conditioned on metric `val_loss` which is not available. Available metrics are: loss
WARNING:tensorflow:Can save best model only with val_loss available, skipping.
WARNING:tensorflow:Reduce LR on plateau conditioned on metric `val_loss` which is not available. Available metrics are: loss,lr
10/10 [==============================] - 44s 4s/step - loss: 0.0038
Epoch 9/10
9/10 [==========================>...] - ETA: 4s - loss: 0.0040WARNING:tensorflow:Early stopping conditioned on metric `val_loss` which is not available. Available metrics are: loss
WARNING:tensorflow:Can save best model only with val_loss available, skipping.
WARNING:tensorflow:Reduce LR on plateau conditioned on metric `val_loss` which is not available. Available metrics are: loss,lr
10/10 [==============================] - 44s 4s/step - loss: 0.0039
Epoch 10/10
9/10 [==========================>...] - ETA: 4s - loss: 0.0036WARNING:tensorflow:Early stopping conditioned on metric `val_loss` which is not available. Available metrics are: loss
WARNING:tensorflow:Can save best model only with val_loss available, skipping.
WARNING:tensorflow:Reduce LR on plateau conditioned on metric `val_loss` which is not available. Available metrics are: loss,lr
10/10 [==============================] - 44s 4s/step - loss: 0.0035
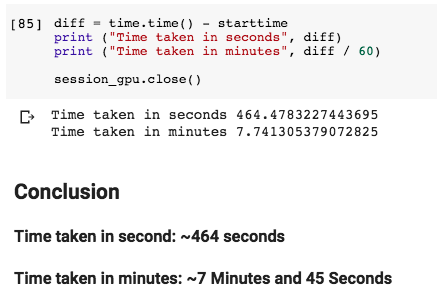
CPU times: user 10min 8s, sys: 1min 22s, total: 11min 30s
Wall time: 7min 12s
The above run takes about ~7 mins (or total time of ~8 mins) on the Google Colab GPU:
CPU times: user 10min 8s, sys: 1min 22s, total: 11min 30s
Wall time: 7min 12s
I’m still unsure on how to interpret this time-related stats but I will take ~7 mins as our execution time till this point.
We finish with the following stats:
So now you can see why I earlier chose ~7 mins as the execution time. So it takes about 7 minutes to process this notebook – giving new predictions of temperature, pressure and wind speed and comparing it with the actual values (true values gather from post observations).
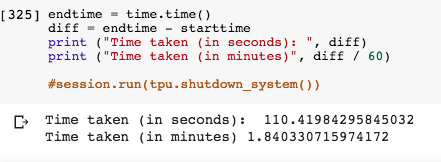
Time series: TPU version
Here snapshots of the notebook (Train the Recurrent Neural Network section), the full notebook can be found on Google Colab, it’s free to download, share and extract the python code in it.
Found TPU at: grpc://10.118.17.162:8470
INFO:tensorflow:Querying Tensorflow master (b'grpc://10.118.17.162:8470') for TPU system metadata.
INFO:tensorflow:Found TPU system:
INFO:tensorflow:*** Num TPU Cores: 8
INFO:tensorflow:*** Num TPU Workers: 1
INFO:tensorflow:*** Num TPU Cores Per Worker: 8
INFO:tensorflow:*** Available Device: _DeviceAttributes(/job:worker/replica:0/task:0/device:CPU:0, CPU, -1, 11845881175500857789)
INFO:tensorflow:*** Available Device: _DeviceAttributes(/job:worker/replica:0/task:0/device:XLA_CPU:0, XLA_CPU, 17179869184, 5923571607183194652)
INFO:tensorflow:*** Available Device: _DeviceAttributes(/job:worker/replica:0/task:0/device:XLA_GPU:0, XLA_GPU, 17179869184, 11085218230396215841)
INFO:tensorflow:*** Available Device: _DeviceAttributes(/job:worker/replica:0/task:0/device:TPU:0, TPU, 17179869184, 12636361223481337501)
INFO:tensorflow:*** Available Device: _DeviceAttributes(/job:worker/replica:0/task:0/device:TPU:1, TPU, 17179869184, 14151025931657390984)
INFO:tensorflow:*** Available Device: _DeviceAttributes(/job:worker/replica:0/task:0/device:TPU:2, TPU, 17179869184, 16816909163217742616)
INFO:tensorflow:*** Available Device: _DeviceAttributes(/job:worker/replica:0/task:0/device:TPU:3, TPU, 17179869184, 4327750408753767066)
INFO:tensorflow:*** Available Device: _DeviceAttributes(/job:worker/replica:0/task:0/device:TPU:4, TPU, 17179869184, 504271688162314774)
INFO:tensorflow:*** Available Device: _DeviceAttributes(/job:worker/replica:0/task:0/device:TPU:5, TPU, 17179869184, 14356678784461051119)
INFO:tensorflow:*** Available Device: _DeviceAttributes(/job:worker/replica:0/task:0/device:TPU:6, TPU, 17179869184, 6767339384180187426)
INFO:tensorflow:*** Available Device: _DeviceAttributes(/job:worker/replica:0/task:0/device:TPU:7, TPU, 17179869184, 1879489006510593388)
INFO:tensorflow:*** Available Device: _DeviceAttributes(/job:worker/replica:0/task:0/device:TPU_SYSTEM:0, TPU_SYSTEM, 17179869184, 17850015066511710434)
WARNING:tensorflow:tpu_model (from tensorflow.contrib.tpu.python.tpu.keras_support) is experimental and may change or be removed at any time, and without warning.
Epoch 1/10
INFO:tensorflow:New input shapes; (re-)compiling: mode=train (# of cores 8), [TensorSpec(shape=(32,), dtype=tf.int32, name='core_id0'), TensorSpec(shape=(32, 1344, 20), dtype=tf.float32, name='input_10'), TensorSpec(shape=(32, 1344, 3), dtype=tf.float32, name='Dense-2_target_30')]
INFO:tensorflow:Overriding default placeholder.
INFO:tensorflow:Remapping placeholder for input
INFO:tensorflow:Started compiling
INFO:tensorflow:Finished compiling. Time elapsed: 3.394456386566162 secs
INFO:tensorflow:Setting weights on TPU model.
 9/10 [==========================>...] - ETA: 1s - loss: 0.0112WARNING:tensorflow:Early stopping conditioned on metric `val_loss` which is not available. Available metrics are: loss
WARNING:tensorflow:Can save best model only with val_loss available, skipping.
10/10 [==============================] - 14s 1s/step - loss: 0.0115
Epoch 2/10
 9/10 [==========================>...] - ETA: 0s - loss: 0.0183WARNING:tensorflow:Early stopping conditioned on metric `val_loss` which is not available. Available metrics are: loss
WARNING:tensorflow:Can save best model only with val_loss available, skipping.
10/10 [==============================] - 5s 501ms/step - loss: 0.0187
Epoch 3/10
 9/10 [==========================>...] - ETA: 0s - loss: 0.0260WARNING:tensorflow:Early stopping conditioned on metric `val_loss` which is not available. Available metrics are: loss
WARNING:tensorflow:Can save best model only with val_loss available, skipping.
10/10 [==============================] - 5s 497ms/step - loss: 0.0264
Epoch 4/10
 9/10 [==========================>...] - ETA: 0s - loss: 0.0324WARNING:tensorflow:Early stopping conditioned on metric `val_loss` which is not available. Available metrics are: loss
WARNING:tensorflow:Can save best model only with val_loss available, skipping.
10/10 [==============================] - 5s 496ms/step - loss: 0.0327
Epoch 5/10
 9/10 [==========================>...] - ETA: 0s - loss: 0.0374WARNING:tensorflow:Early stopping conditioned on metric `val_loss` which is not available. Available metrics are: loss
WARNING:tensorflow:Can save best model only with val_loss available, skipping.
10/10 [==============================] - 5s 470ms/step - loss: 0.0376
Epoch 6/10
 9/10 [==========================>...] - ETA: 0s - loss: 0.0378WARNING:tensorflow:Early stopping conditioned on metric `val_loss` which is not available. Available metrics are: loss
WARNING:tensorflow:Can save best model only with val_loss available, skipping.
10/10 [==============================] - 5s 471ms/step - loss: 0.0372
Epoch 7/10
 9/10 [==========================>...] - ETA: 0s - loss: 0.0220WARNING:tensorflow:Early stopping conditioned on metric `val_loss` which is not available. Available metrics are: loss
WARNING:tensorflow:Can save best model only with val_loss available, skipping.
10/10 [==============================] - 5s 489ms/step - loss: 0.0211
Epoch 8/10
 9/10 [==========================>...] - ETA: 0s - loss: 0.0084WARNING:tensorflow:Early stopping conditioned on metric `val_loss` which is not available. Available metrics are: loss
WARNING:tensorflow:Can save best model only with val_loss available, skipping.
10/10 [==============================] - 5s 493ms/step - loss: 0.0081
Epoch 9/10
 9/10 [==========================>...] - ETA: 0s - loss: 0.0044WARNING:tensorflow:Early stopping conditioned on metric `val_loss` which is not available. Available metrics are: loss
WARNING:tensorflow:Can save best model only with val_loss available, skipping.
10/10 [==============================] - 5s 495ms/step - loss: 0.0044
Epoch 10/10
 9/10 [==========================>...] - ETA: 0s - loss: 0.0040WARNING:tensorflow:Early stopping conditioned on metric `val_loss` which is not available. Available metrics are: loss
WARNING:tensorflow:Can save best model only with val_loss available, skipping.
10/10 [==============================] - 5s 491ms/step - loss: 0.0040
CPU times: user 10.8 s, sys: 2.7 s, total: 13.5 s
Wall time: 1min 6s
There are a few of things to still work on the notebook, one of them being getting rid of the warnings appearing during training on the TPU. As per our previous analysis, running on the TPUs should be way faster than GPUs, correction: TPUs are faster than GPUs even when running the Timeseries TPU version (I aligned the two notebooks i.e. GPU and TPU versions of the Timeseries notebooks and re-ran the two experiments). We haven’t been successful in being able to execute code cells till the end of the notebook due to errors in input shape which needs fixing and re-running the notebook. All of these look like good learning opportunities for me and everyone else. Our new results are more promising as you can see from above. And the whole notebook just took ~2 minutes to finish running, that’s so many times speed up over the GPU version (from the below).
Observations
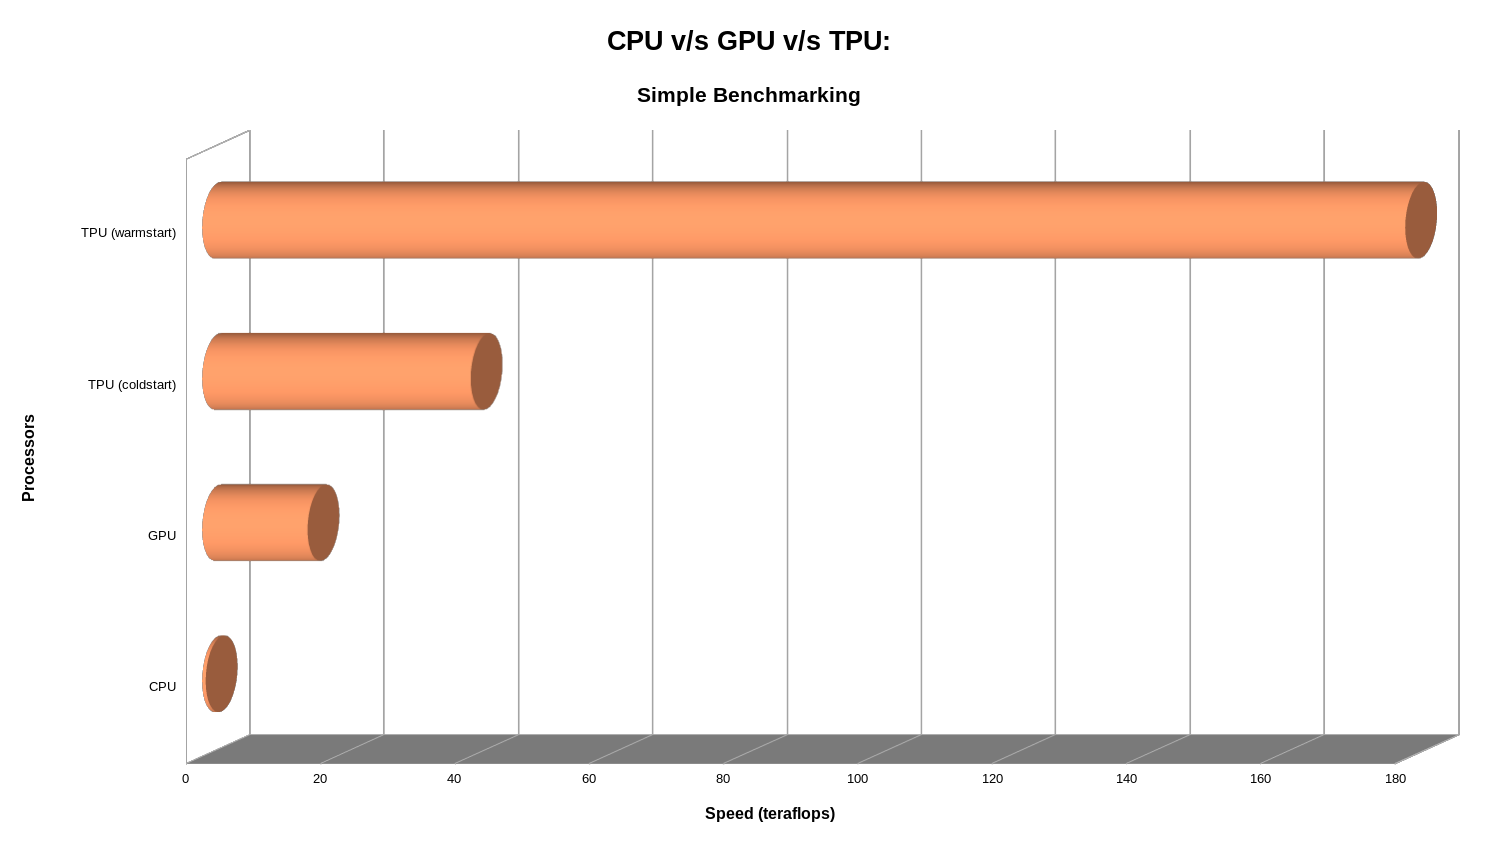
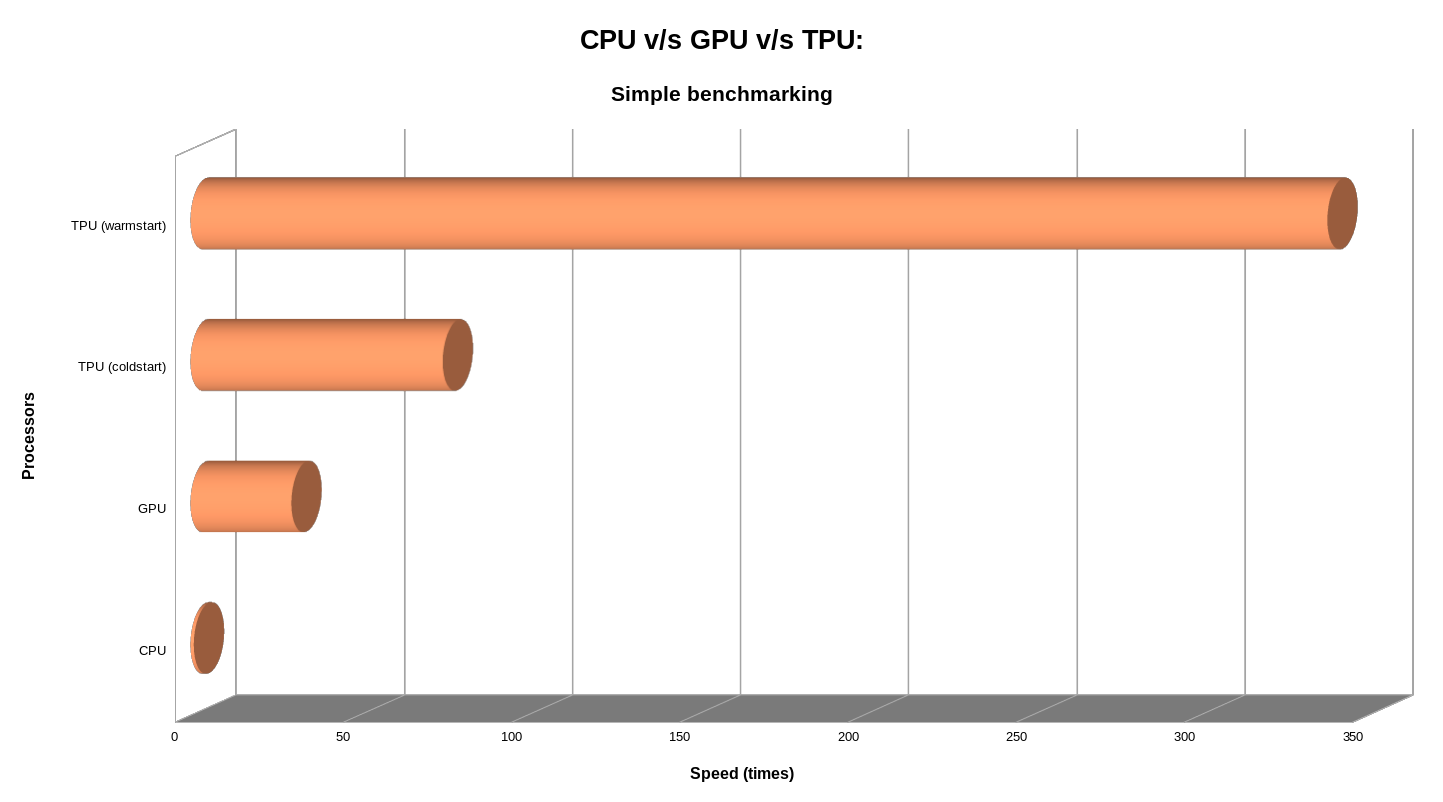
We can now see the final outcome of the TPU version of the Timeseries notebook, the initial Simple Benchmarking related examples did help us make the below observations:
TPUs are ~85x to ~312x faster than CPUs, and GPUs are ~30x faster than CPUs
which also means that
TPUs are ~3x to ~10x faster than GPUs, which in turn are ~30x faster than CPUs
Some graphs plotting the speeds in teraflops and times between CPU v/s GPU v/s TPU:
Note: that during some runs on GCP, the above numbers showed higher than noted here so please beware of that as well. Maybe the notebooks took advantage of some improvements in the GCP infrastructure.
The different devices ran this simple task (block of code mentioned in the previous section) at different speeds, for a more complex task, the numbers would definitely be different, although we believe that their relative performances shouldn’t deviate too much.
Conclusion
Also, want to thank Yaz for being super-encouraging at all times during this whole process including for the presentation at Google Cloud Next 2018. Not forgetting Claudio who contributed quite a bit to the TPU version of the Timeseries notebook, whilst we have been debugging it.
In the end, it was all great and we will solve all the problems of humanity but for now, we have pretty much finished working on the TPU version of the Timeseries notebook, I welcome everyone to take a jab at it and see if you want to improve it further or experiment with it. Please hit back with your feedback and/or contributions in any case.
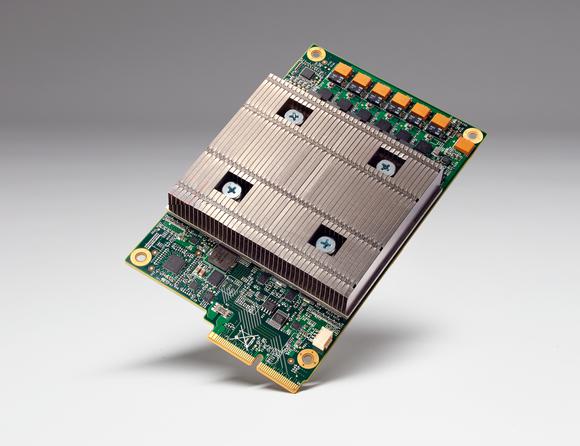
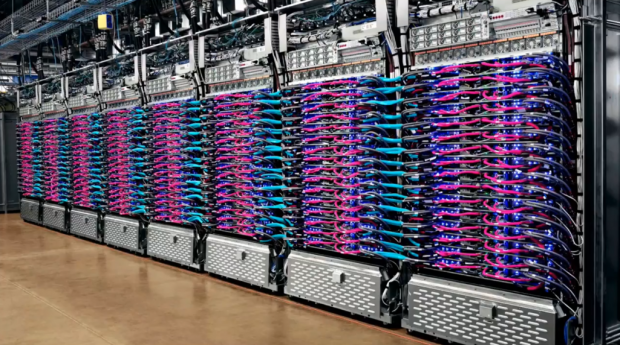
(Third generation TPU at the Google Data centre: TPU 3.0)
Have a read of what others (i.e. Jeff Hale’s article) are talking about the different PUs on various cloud providers and you can see GCPCloud leading in many such areas.
Be ready for some more notebook fests coming up in the form of more blog posts in the near to distant future. Please share your comments, feedback or any contributions to @theNeomatrix369, you can find more about me via the About me page.